STEM Little Explorers
Knowing through exploring.
Home » Articles » STEM » STEM Science » How to Demonstrate Diffusion with Hot and Cold Water


How to Demonstrate Diffusion with Hot and Cold Water
We all need some space sometimes, right that’s true down to a molecular level. molecules don’t like to stay too close together and will try to move to less crowded areas. that process is called diffusion and we will explore all about it in this simple but revealing experiment., article contents.
What is Diffusion?
Have you ever smelled your neighbor’s lunch on your way home? Or smelled someone’s perfume minutes after that person was gone? You experienced the diffusion!
Diffusion is a movement of particles from the area of high concentration to an area of low concentration. It usually occurs in liquids and gases.
Let’s get some complex-sounding terminology out of the way. When talking about diffusion, we often hear something about the concentration gradient (or electrical gradient if looking at electrons). Gradient just means a change in the quantity of a variable over some distance. In the case of concentration gradient, a variable that changes is the concentration of a substance. So we can define the concentration gradient as space over which the concentration of our substance changes.
For example, think of the situation when we spray the air freshener in the room. There is one spot where the concentration of our substance is very high (where we sprayed it initially) and in the rest of the room it is very low (nothing initially). Slowly concentration gradient is diffusing – our freshener is moving through the air. When the concentration gradient is diffused, we reach equilibrium – the state at which a substance is equally distributed throughout a space.
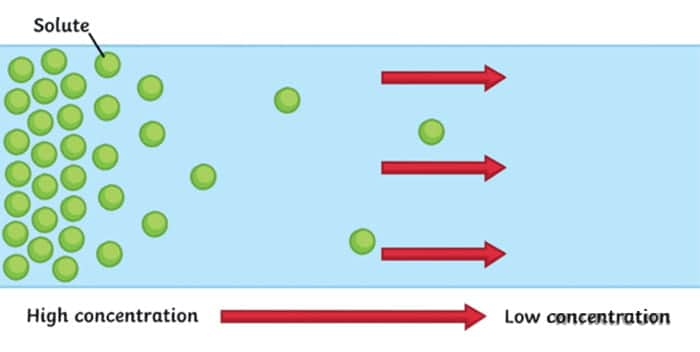
It’s important to note that particles never stop moving , even after the equilibrium is reached. Imagine two parts of the room divided by a line. It may seem like nothing is happening, but particles from both sides are moving back and forth. It’s just that it is an equal probability of them moving from left to right as it’s from right to left. So we can’t notice any net change.
Diffusion is a type of passive transport . That means it doesn’t require energy to start. It happens naturally, without any shaking or stirring.
There is also a facilitated diffusion which happens in the cell membranes when molecules are transported with the help of the proteins.
You may remember hearing about Osmosis and think about how is this different from it. It is actually a very similar concept. Osmosis is just a diffusion through the partially permeable membrane. We talked about it more in our Gummy Bear Osmosis Experiment so definitely check it out.
What causes Diffusion?
Do particles really want to move somewhere less crowded? Well, no, not in the way we would think of it. There is no planning around, just the probability.
All fluids are bound to the same physical laws – studied by Fluid mechanics , part of the physics. We usually think of fluids as liquids, but in fact, air and other types of gas are also fluids ! By definition , fluid is a substance that has no fixed shape and yields easily to external pressure.
Another property of the fluids is that they flow or move around. Molecules in fluids move around randomly and that causes collisions between them and makes them bounce off in different directions.
This random motion of particles in a fluid is called Brownian motion . It was named by the biologist Robert Brown who observed and described the phenomenon in 1827. While doing some experiments with pollen under the microscope, he noticed it wiggles in the water. He concluded that pollen must be alive. Even though his theory was far off, his observation was important in proving the existence of atoms and molecules.
Factors that influence Diffusion
There are several factors that influence the speed of diffusion. The first is the extent of the concentration gradient . The bigger the difference in concentration over the gradient, the faster diffusion occurs.
Another important factor is the distance over which our particles are moving. We can look at it as the size of a container. As you may imagine, with the bigger distance, diffusion is slower, since particles need to move further.
Then we have characteristics of the solvent and substance. The most notable is the mass of the substance and density of the solvent . Heavier molecules move more slowly; therefore, they diffuse more slowly. And it’s a similar case with the density of the solvent. As density increases, the rate of diffusion decreases. It’s harder to move through the denser solvent, therefore our molecules slow down.
And the last factor we will discuss is the temperature . Both heating and cooling change the kinetic energy of the particles in our substance. In the case of heating, we are increasing the kinetic energy of our particles and that makes them move a lot quicker. So the higher the temperature, the higher the diffusion rate.
We will demonstrate the diffusion of food coloring in water and observe how it’s affected by the difference in temperature. Onwards to the experiment!
Materials needed for demonstrating Diffusion
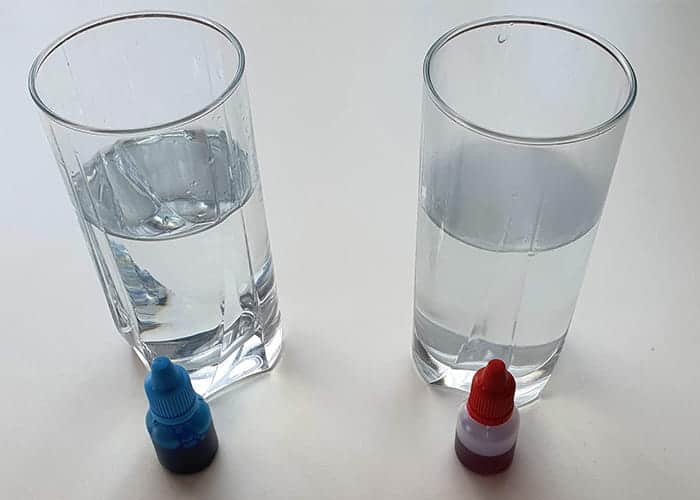
- 2 transparent glasses – Common clear glasses will do the trick. You probably have more than needed around the house. We need one for warm water and one for cold water so we can observe the difference in diffusion.
- Hot and cold water – The bigger the difference in temperature in two glasses, the bigger difference in diffusion will be observed. You can heat the water to near boiling or boiling state and use it as hot water. Use regular water from the pipe as “cold water”. That is enough difference to observe the effects of temperature on diffusion.
- Food coloring – Regular food coloring or some other colors like tempera (poster paint) will do the trick. Color is required to observe the diffusion in our solvent (water). To make it more fun, you can use 2 different colors. Like red for hot and blue for cold.
Instructions for demonstrating diffusion
We have a video on how to demonstrate diffusion at the start of the article so you can check it out if you prefer a video guide more. Or continue reading instructions below if you prefer step by step text guide.
- Take 2 transparent glasses and fill them with the water . In one glass, pour the cold water and in the other hot water. As we mentioned, near-boiling water for hot and regular temperature water from the pipe will be good to demonstrate the diffusion.
- Drop a few drops of food coloring in each cup . 3-4 drops are enough and you should not put too much food color. If you put too much, the concentration of food color will be too large and it will defuse too fast in both glasses.
- Watch closely how the color spreads . You will notice how color diffuses faster in hot water. It will take longer to diffuse if there is more water, less food color and if the water is cooler.
What will you develop and learn
- What is diffusion and how it relates to osmosis
- Factors that influence diffusion
- What is Brownian motion
- How to conduct a science experiment
- That science is fun! 😊
If you liked this activity and are interested in more simple fun experiments, we recommend exploring all about the heat conduction . For more cool visuals made by chemistry, check out Lava lamp and Milk polarity experiment . And if you, like us, find the water fascinating, definitely read our article about many interesting properties of water .
If you’re searching for some great STEM Activities for Kids and Child development tips, you’re in the right place! Check the Categories below to find the right activity for you.

STEM Science
Videos, guides and explanations about STEM Science in a step-by-step way with materials you probably already have at your home. Find new Science ideas.

STEM Technology
Videos, guides and explanations about STEM Technology in a step-by-step way with materials you probably already have at your home. Find new Technology ideas.

STEM Engineering
Videos, guides and explanations about STEM Engineering in a step-by-step way with materials you probably already have at your home. New Engineering ideas!

Videos, guides and explanations about STEM Math in a step-by-step way with materials you probably already have at your home. Find new Mathematics ideas.
Find out all about development psychology topics that you always wanted to know. Here are articles from child psychology and development psychology overall.

First year of Child’s Life
Following a Child’s development every month from its birth. Personal experiences and tips on how to cope with challenges that you will face in parenting.
4 thoughts on “ How to Demonstrate Diffusion with Hot and Cold Water ”
- Pingback: How to Make Colorful Milk Polarity Experiment - STEM Little Explorers
- Pingback: How to make a Lava Lamp | STEM Little Explorers
- Pingback: Learn about pressure with Can Crush Experiment - STEM Little Explorers
- Pingback: Gummy bear Osmosis Experiment - STEM Little Explorers
Leave a Reply Cancel reply
You must be logged in to post a comment.
Get Fresh news from STEM fields
I'm not interested in STEM
- Skip to primary navigation
- Skip to main content
- Skip to primary sidebar

- FREE Experiments
- Kitchen Science
- Climate Change
- Egg Experiments
- Fairy Tale Science
- Edible Science
- Human Health
- Inspirational Women
- Forces and Motion
- Science Fair Projects
- STEM Challenges
- Science Sparks Books
- Contact Science Sparks
- Science Resources for Home and School
Diffusion Demonstration
March 29, 2021 By Emma Vanstone Leave a Comment
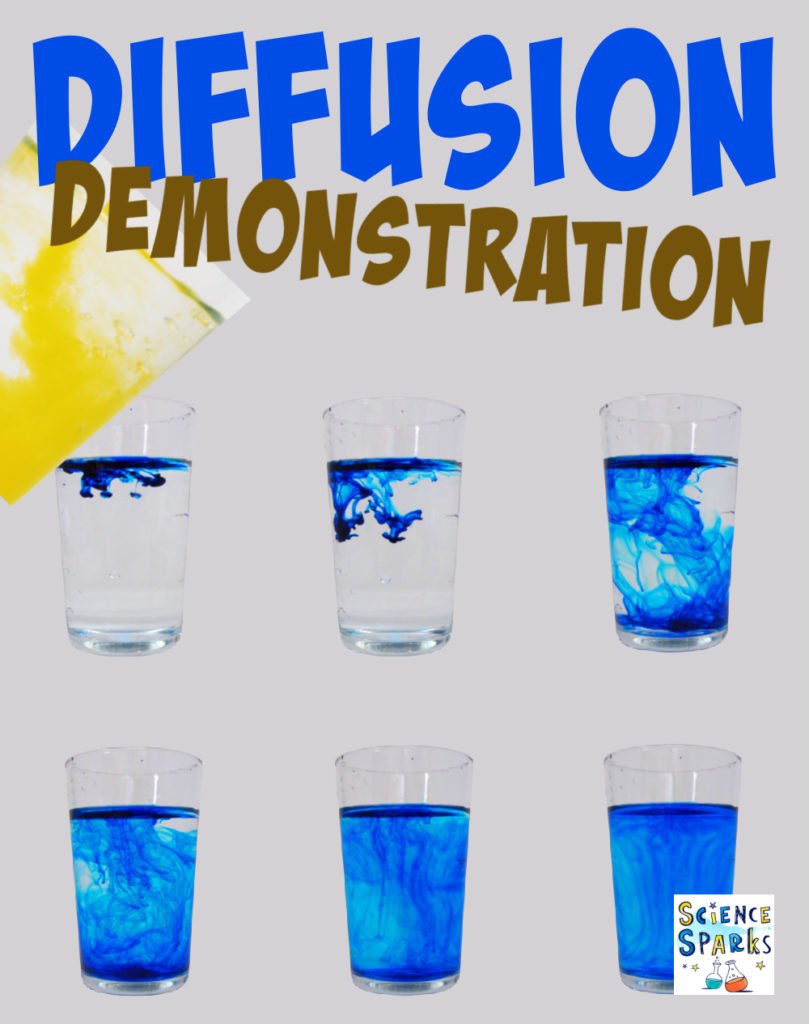
Imagine pulling a delicious cake out of an oven, the smell slowly spreads around the room and then through the house. This is diffusion! The lovely cake smelling particles move from where there are lots of them ( high concentration ) to where there are less of them ( low concentration ). Diffusion can be quite a slow process as the movement of particles is random. One very easy diffusion demonstration is to pour squash or food colouring into a glass of water and watch as the colour spreads through the glass.
Diffusion is the movement of a substance from an area of high concentration to an area of low concentration until its concentration becomes equal throughout the available space.
This video shows diffusion in action .
Diffusion Demonstration with Squash and Water
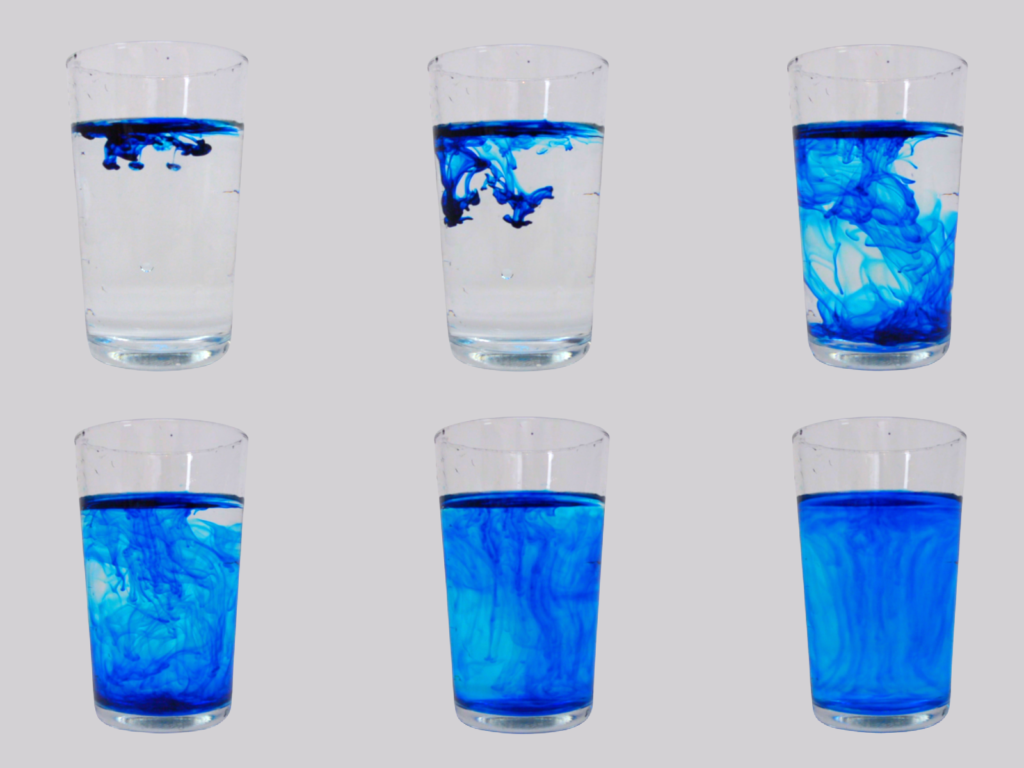
Squash or juice in water is a great demonstration of diffusion. You can see the squash starts in one area and then starts to move from areas of high squash concentration to areas of low concentration. Eventually the squash spreads throughout the whole glass and the colour becomes paler and even throughout.
I used food colouring in the images below to make the process easier to see.
Diffusion using food colouring and water
What is diffusion?
Diffusion is the movement of a substance from an area of high concentration to an area of low concentration.
Diffusion occurs in gases and liquids. Particles in gases and liquids move around randomly, often colliding with each other or whatever container they are in. When they collide they change direction which means eventually they spread out through the whole available space.
Examples of Diffusion
Diffusion in humans.
Oxygen diffuses from the alveoli of the lungs into red blood cells. This is because the concentration of oxygen in the alveoli is high and the concentration of oxygen in the red blood cells is low. Red blood cells have very thin cell walls which allows oxygen to diffuse easily in and out of them.
Diffusion in plants
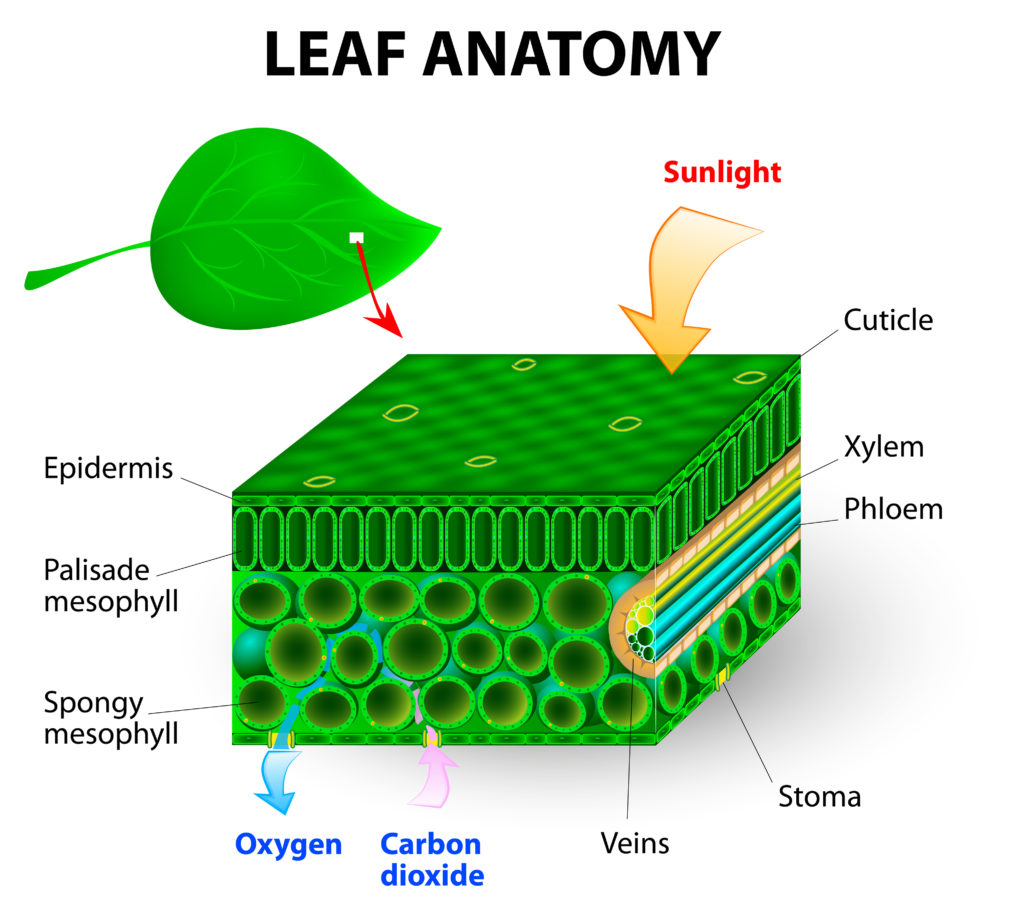
Plants use carbon dioxide fro the air for photosynthesis. Carbon dioxide enters the leaves through small holes called stomata in the underside of the leaf. Spongy cells called mesophyll cells allow gases to diffuse easily in and out of the leaf. The stomata can open and close so the plant doesn’t lose too much water.
More diffusion demonstrations
Making a cup of tea is another great diffusion demonstration. This diffusion activity using different shaped tea bags is great fun.
Another example of movement of substances important for living things is osmosis .
Last Updated on November 3, 2021 by Emma Vanstone
Safety Notice
Science Sparks ( Wild Sparks Enterprises Ltd ) are not liable for the actions of activity of any person who uses the information in this resource or in any of the suggested further resources. Science Sparks assume no liability with regard to injuries or damage to property that may occur as a result of using the information and carrying out the practical activities contained in this resource or in any of the suggested further resources.
These activities are designed to be carried out by children working with a parent, guardian or other appropriate adult. The adult involved is fully responsible for ensuring that the activities are carried out safely.
Reader Interactions
Leave a reply cancel reply.
Your email address will not be published. Required fields are marked *
Real Diffusion Experiment (for Home or School)

Introduction: Real Diffusion Experiment (for Home or School)

As part of my research and my physics degrees I've been studying a lot about diffusion and diffusion-related subjects. After a while it finally hit me that I learned about diffusion before - in my highschool biology class. I thought about the experiments they showed us, and something didn't make sense. So I searched YouTube for diffusion demonstrations, and they looked pretty much the same - someone drops a bit of dye into a large water-filled beaker, and after a few minutes the entire beaker is colored.
At this point I realized how big the misconception about diffusion is! Most diffusion demos are completely wrong !
As I'll show you soon enough, diffusion on these scales takes weeks to happen! All of these demos in fact show a process called 'convection' in which the dye mixes due to currents and swirls in the liquid, not due to diffusion.
So, in this instructable I'll first try to convince you that there's something wrong with these experiments, and that we should re-evaluate how we demonstrate diffusion to student. Then, I'll show you how you can perform diffusion experiments the right way (there's more than one way, of course!). Finally, I'll discuss some of the consequences of the results, which can actually teach us a lot about the world we're living in.
My hope is that - if I convince you that the typical diffusion demos are wrong - you spread the word! Teach the ones you can! And on the other hand, if you think that I'm wrong here - I'd love to hear your opinion, see your experimental data, and talk about it!
I've been waiting to make an instructable about this subject for a while now, but I never really got to it. Finally, the science fair contest motivated me getting it done and posting this article :) I hope you like it!
I made a video about this project for those who like watching narrated videos
If you have any questions or comments, I'd love to hear all of them!
Step 1: what's wrong with typical diffusion demos.

In the diffusion demonstrations we're used to seeing, the main things that cause the dye to mix are not diffusion. It is swirls and currents in the liquid, a process called convection. Most commonly, a drop of dye is injected into a large water-filled beaker, and the audience watch as the color mixes (see the GIF I attached of such experiment I performed myself). The spread of the dye is said to be due to diffusion. However, this is not true. You can clearly see currents and swirls in the liquid (convection).
There are many things that cause the convection. First, the beakers are often wide open and so any currents in the air are transferred to the water, causing them to swirl. Next, since the top of the beaker is open, there's evaporation of water happening (see the drawing I attached). This means that the top of the water container becomes cooler than the bottom. Since cold water is slightly denser, it tends to sink, which leads to currents and swirls again. Finally, these experiments are often done with warm water in intent to show that diffusion is temperature-dependent. However, everything I just mentioned is also enhanced with the increased temperature! The difference between the beaker's temperature and the rest of the room is bigger, and so the water develops an even steeper temperature gradient, which makes everything even worse!
Diffusion, as it turns out, can be very very slow. Humans are used to seeing big things - things on the scale of a mm (1/25") are already pretty small for the human eye. However, diffusion is extremely inefficient at these sizes! Diffusion is fast and efficient only on the scale of microns and smaller, and if you follow along, you'll see exactly why!
This should not be discouraging - the fact that diffusion is slow on large scales - but quick on small scales - explains so much of the world around us, including a lot of biological phenomena, and I'll elaborate on that in the final section.
I'm not trying to say that diffusion experiments are impossible to see and demonstrate, I'm just saying that the most common form of diffusion demos is wrong! There are ways to do it right!
Step 2: Experimental Setup

We need to make sure that convection doesn't happen in our experiment. Here are the things that helped me get it done. I tried skipping some of these, but it didn't work :)
- Use a thin container. Glass test tubes or other things with similar proportions could work. These are pretty cheap, I bought mine from AliExpress.
- We should make sure that when we inject the dye, it doesn't swirl right from the start. To do that, I used salt water (5% salt) instead of tap water. This made them heavier and so the dye floated on them. It doesn't change anything for diffusion (why? you can ask your students questions like this one! let me know if you want the answer), but it helps with the initiating the experiment in a controlled manner.
- Let all of the liquids rest at room temperature before starting. If they have different temperatures, it'll cause convection.
- Inject the dye gently to the top of the container so that it floats at the top. Avoid dropping it from a distance.
- Use plastic wrap or a cork cap to seal the test tube after you initiate the experiment. This will help fight the evaporation and air currents from messing with your experiment.
- Finally, this experiment is best done in a constant environment where the temperature is pretty constant over time. If you want to film it, a good place would be inside a cabinet or a closet.
I used a dye called Fluorescein which is very common in laboratories (often used for diffusion experiments). However, food coloring or ink work perfectly fine. If it's water soluble and has a strong color, it should be fine.
Step 3: Data Capture

Capturing the data is important if we want to have a quantitative understanding of the phenomena. It will also let us see the diffusive behavior as a function of time even though things are moving slowly (see the GIF I attached - that's 48 hours!).
- You want the capture data with a nice clear background. I found that using a black paper works well, but it often depends on the type of food coloring or dye you're using.
- You also want to capture images with constant lighting and camera settings. For that reason, I kept the experiment running inside a closet with a fixed light source :) sunrise & sunset can interfere with your data.
- I found a really nice app called 'Open Camera' (thanks Orit !). It allows you to take timelapse images, set the image resolution, and fix the focus / exposure so it doesn't change automatically. You can also save the data to a google drive folder which means you can check how things are going without opening the closet and having the risk of a ruined experiment. You shouldn't take more than an image every 5-10 minutes. Nothing happens that fast anway, the experiment will probably be running for days.
- Before initiating the experiment, take an image with something of a known size. For example, taking a picture of a ruler would be useful. You'll see more about why this is needed in step 6.
- Initiate the experiment and wait. Take the time and follow the images over your google-drive folder. Try to avoid opening the closet while the experiment is running!
Step 4: Data Analysis Software - 'Tracker' (free Academic Software)

There are many ways analyze the experimental data. I found Tracker can be used in so many physics experiments that it's worth getting to know. It's available in many different languages (not only English), so young students from all over the globe can use it.
Download the Tracker software here . There's an online version but it doesn't work well.
An alternative to 'Tracker' is a software called 'ImageJ' or 'Fiji' (basically the same). It works great too, and has some advanced options too.
To start analyzing your videos, import them. Tracker accepts videos of many formats, but also sequences of images. Note that sequences of images need be named in a fixed format with a incrementing numbers. For example, Img001, Img002, Img003... are good file names (see first image)
You'll often want to rotate the image so that the direction you're interested in is horizontal. To do that, right-click the video, and press filters -> new -> rotate. Rotate the image in the desired direction (see second image).
I've also written a code python to analyze a sequence of images automatically , more about that (file included) in the data-analysis step.
Step 5: Calibrate Pixels to Physical Units

We took images or videos of the real world, but the software has no way of knowing what we're looking at, what's it's size, and how often images were taken. We need to calibrate both space (distances) and time to physical units. You'll need to do this even if you analyze the data in a different software.
To Convert Pixels to Distance Units (GIF #1):
- Select the 'calibration tools' from the toolbar.
- Add a new calibration stick.
- Align it along a known distance. For example, I took a picture of a ruler.
- Calibrate the measured distance. I'm using meters, but you can change to any units you like by pressing the 'Coordinate system' tab -> 'Units...' and setting your preferred system of units.
To Calibrate Time (GIF #2):
- Right-click the video (anywhere on the screen), and press 'Clip Settings'
- Set the frame rate (FPS) or the time interval between images in a sequence (dt). I analyzed images that were taken every 30 minutes, so I set 'dt' to 1800 seconds.
You can set the coordinate system (where x, y = 0) and its orientation on the screen by pressing the coordinate axes tool in the toolbar (see third image).
That's it, from this point on your measurements will be in physical units.
Step 6: Measure the Diffusion Process Over Time
I'm including here 3 different types of analysis. I'll list them in order of complexity, the first one being the easiest one to use but also the least accurate, and the last one being the most complex and accurate method of analysis.
First Method - 'By Eye' (GIF #1):
The food coloring (or whatever ink or chemical you're using as dye) colors the water. We can look for the point where it is no longer visible, and track it's position over time.
- In the 'Tracker' software, press 'Track' -> 'New' -> 'Point Mass'.
- Hold 'Shift' and use the mouse choose the point at which the paint is not longer visible. Each time you click, the software will move on to the next frame.
- You can go back and edit points if you like. You can also decide to skip multiple frames in each click by changing the 'step size' at the bottom. This can be useful especially when things change slowly.
- Keep going until you went through all of the video / image sequence.
Second Method - Intensity Profile (GIF #2):
The previous method lacks some accuracy. 'The point where the dye is not longer visible' is not well defined, and depends on the person analyzing the data. A more robust way of analyzing the data is by looking at the intensity profile of the image. Brighter regions have higher intensity than darker regions. We can measure in Tracker as well.
- Add a new Track of a 'Line Profile' type.
- Use Shift to place it along the direction of the diffusion process.
- A window will open on the right side of the screen showing the intensity as a function of distance. Define a point in the intensity profile that you want to track. For example, 'the point where intensity is equal to 50'.
- Measure it's position over time. You'll need to write down the time and position of each point manually (you can write it into an Excel sheet). Students can do this in pairs to save time. I realize this can be time consuming if you go through all of the captured frames, but analyzing about 20-30 frames should be plenty! Adjust the 'step size' so you skip through more than one image at a time.
Third Method (GIF #3):
This method is basically an upgrade of the previous one. I wrote a python code that analyzes the data automatically. It runs through each image and measures the intensity profile along a selected region. It does a few extra things like removing the background noise and such. Also, I used a green dye so it analyzes the green channel of an RGB image, but you can make a small modification to the code to analyze other colors or all of them combined.
- Run the code and analyze your images.
- You'll end up with all of the intensity profiles. All that is left is to track a selected point along the profile. Say, 50 gray points above the background. Define a threshold that would work for your images.
- For each profile, calculate it's distance from the threshold, that is: abs(profile - threshold). The smallest value of this vector will be the point where the profile is equal to the intensity threshold you've chosen, so the easiest way to find it is by looking for: min(abs(profile - threshold). I've attached MATLAB code that does all of this, plots the profiles, and saves them as images.
Attachments
Step 7: how fast are things moving.

Now that we have tracked the diffusion process over time, we can start the final part of the experiment. In this part we will try to answer questions about the rate at which diffusion occurs.
By looking at the images we've aquired we already have an intuitive feeling for it - diffusion starts off pretty fast, but then, as time passes, it slows down. My experiment was running for 48 hours, and the test tube was far from well mixed. The typical distance the dye I used propagated was about 1cm (less than 1/2"). This is very slow, and very typical for diffusion in water!
I made a GIF of the time dependence of the intensity profile for the first 48 hours of the experiment. We can see that the profile changes very rapidly at first, but then it slows down. This is what we see in the images too, so that's a good sign the analysis works :) I then defined the point where the front of the intensity profile reaches a value of 50 gray points above the background intensity, and marked it with an orange circle on each of the profiles (see third method in the previous step for details). I called this point 'x_D' (D for diffusion).
Finally, I plotted x_D as a function of time (see the graph I attached). x_D is shown with orange markers. There's also a blue line on the graph. This graph describes a theoretical fit to the data. Diffusion has a very precise physical formulation which matches reality to very high accuracy. It suggests that diffusion should occur at a rate that scales as the square root of time. In other words, x_D should scale as: x_D ~ sqrt(D * t), where 'D' is the diffusion coefficient of the dye in water and 't' is time. So, I tried to fit the x_D data to a function of the form x_D = sqrt(D * t). The fit is very good, so it seems that diffusion does scale as the square root of time, as expected! I could also use the fitted function to get an estimate for the diffusion coefficient, and found that it is of the order of 4 * 10^-6 [cm^2/sec]. This is very close to the real value of the dye I used (5.5 * 10^-6 [cm^2/sec]). This difference was expected since I could have defined x_D slightly differently and end up with other results. Measuring the exact diffusion coefficient takes a little more effort than what I did here, but for an estimate and order-of-magnitudes this is perfectly fine.
Step 8: Conclusions

We saw that x_D scales as x_D ~ sqrt(D * t). We can now ask, if we wanted for the dye to reach a point x_D away from the source of the dye, how long should we wait? This is answered by inverting the equation: t_D = (x_D ^2)/D. This seems mondane - nothing special, right? But this equaion dictates so much in biology and life. For example, have you ever wondered why cells are small? Why don't we see huge elephant-sized cells? One of the main reasons for that is that cells depend on diffusion to obtain nutrients. If cells were too big, diffusion would become inefficient. Using the diffusion coefficient we found, we see that diffusion will take about 40 minutes to pass just 1mm (1/25.4"), but it would take less than a second to pass a distance of 10 microns , a typical distance to travel when thinking about cells. For instance, when you exercise, your muscle cells need constant supply of oxygen. If the cells were too big (1mm sounds small, right?), diffusion would become inefficient and the oxygen supply wouldn't reach the inside of the cells fast enough. [the sizes-GIF was created base on Learn Genetics ]
To conclude,
We saw that diffusion experiments need careful attention and a lot of patience. I found that the best way to demonstrate this phenomenon is by capturing a video. You can do that with the students if you want to take this into the class-room. Another option would be to initiate the experiment on one day and looking at the results the next day. You'll see the dye has started to mix into the water.
On large scales, diffusion takes a very long time (over a mm or 1/25.4 of an inch is already considered large!), but on very small scales, such as the sizes of cells (a few microns), diffusion is a very efficient way to move things around. This explains a lot about biological processes and other physical phenomena. I think that once you develop intuition for the process and its time-scales, you can appreciate so many things about the world around us.
I hope you found this topic as interesting as I find it! And if you're in the world of teaching, I hope you spread the word! There's a huge misconception about diffusion due to wrongful demonstrations, and it's our job to make things right :)
If you like my instructable and want to see more, you're welcome
To visit my instructables page and my website.
By the way, if you want to support my projects - subscribing to my new YouTube channel is currently the best way to do that! :)

Explaining Diffusion to a Child: Simple Science Fun
July 27, 2024 | Biology | 0 comments

Did you know that diffusion can happen super fast? For example, red food coloring spreads out quickly in hot water but takes longer in cold water. This shows how cool and interesting science can be! Learning about diffusion is key for kids to understand basic science.
Diffusion happens all around us, like when you smell fresh cookies or see food coloring mix in water. This guide on diffusion for kids will show you fun ways to teach them about it. With easy explanations and examples, you can make learning about diffusion fun for kids!
Key Takeaways
- Diffusion is the movement of particles from high concentration to low concentration.
- Temperature significantly affects the rate of diffusion; warmer temperatures allow faster particle movement.
- Teaching diffusion can involve fun experiments, like using food coloring in water.
- Children can relate to diffusion through everyday experiences, making it easier to understand.
- Visual aids and demonstrations enhance children’s comprehension of diffusion.
Table of Contents
What is Diffusion?
Diffusion is when substances move from where they are more concentrated to where they are less concentrated. This happens in gases and liquids. Particles move randomly, spreading out evenly over time.
Understanding Particle Movement
Particle movement is all about random interactions between molecules. These interactions make particles spread out evenly. For instance, sugar dissolves in water because the sugar molecules move around, filling the container.
Images show how solute molecules spread out, helping us see this process. It’s like watching a puzzle come together piece by piece.
High Concentration vs. Low Concentration
Knowing the difference between high and low concentration helps us understand diffusion. Think about the smell of food spreading in a room. It’s strong near the food and fades as you move away.
This shows how particles move from a crowded area to a less crowded one. Explaining these ideas can be fun and easy for kids to grasp.
How to Explain Diffusion to a Child
Explaining diffusion might seem hard, but it can be easy and fun. Use simple words and examples that kids can relate to. This way, they can understand diffusion without getting confused.
Simple Definitions
Start with a simple definition: Diffusion is the movement of particles from an area of high concentration to an area of low concentration. Imagine the smell of popcorn filling a room. The aroma spreads out until it’s everywhere. This shows how diffusion happens in our daily lives.
Relatable Examples
Using everyday examples can make learning fun. Here are some easy ways to explain Diffusion to kids:
- Color in Water: When you add food coloring to water, it spreads out. This shows how diffusion works with liquids.
- Sugar Cube: Put a sugar cube in water and watch it dissolve. The sugar particles move into the water, showing diffusion.
- Ammonia Smell: Spray air freshener in a room corner. Soon, the scent spreads everywhere, showing how gas diffusion works.
These examples grab kids’ attention and teach them about diffusion’s role in nature. For more ideas on teaching kids about the environment, check this resource .
Easy Explanation of Diffusion for Kids
Talking about diffusion to kids can be fun and easy. Use everyday things they like to help them understand. This makes learning about diffusion fun and easy. Pictures and drawings help make it stick in their minds.
Using Everyday Scenarios
Kids can see diffusion in everyday things. For example, when you mix sugar into lemonade, it spreads out. At first, the sugar is at the bottom, but it mixes with the water. This shows how particles move from a crowded area to a less crowded one.
Watching crayons melt in warm water is another great way to show diffusion. Kids can see the crayons break down and spread the color. This lets them see how different things mix together.
Illustrations and Visual Aids
Images and diagrams help kids understand complex ideas. They can see how particles move from one place to another. Making art with markers and water is a fun way to show diffusion in action.
Using things like white cardstock and plastic bags lets kids see diffusion up close. These activities are exciting and teach kids well. Linking these to nutrition shows how different things work together in our diet and world.

Getting kids involved in these activities makes them curious and helps them understand. The more they can touch and see it, the easier it is to explain.
Fun Ways to Teach Kids About Diffusion
Teaching kids about Diffusion can be fun and hands-on. Activities and demos make learning exciting and simple. They help kids understand complex ideas better.

Interactive Demonstrations
Interactive demos are a great way to teach kids about diffusion. For example, using food coloring in water shows how it spreads. Kids see how warm water makes it spread faster.
This makes the concept clear. It shows how temperature affects particles moving. Kids learn by doing experiments, like with gummy bears in different solutions. This connects school to real life.
Creating Engaging Experiments
Fun experiments make learning about Diffusion active. Using baby oil, food coloring, and water shows density and solubility. Kids see how food coloring moves through layers, showing diffusion.
Studies show these hands-on methods boost engagement by 75% and retention by 60%. Linking it to nature makes kids more curious and eager to learn.
For more tips on explaining tough topics to kids, check out this useful guide .
Child-Friendly Explanation of Diffusion
Explaining science to kids needs simple language and relatable examples. Using terms they get, teachers and parents can make complex ideas fun. For example, comparing Diffusion to a sugar cube dissolving in water helps kids connect it to their lives.
Using Language Kids Understand
Kids like stories and pictures more than hard words. Say things like “spreading out” and “mixing together.” Using simple examples, like how a room smells of fresh cookies, shows Diffusion in action. This helps kids see how particles move from one place to another in their world.
Encouraging Questions and Curiosity
Getting kids interested in Diffusion means sparking their curiosity. Ask them “Why does food coloring spread in water?” or “How does perfume move through the room?” These questions lead to deeper learning and fun discoveries. Doing hands-on activities, like watching Diffusion happen, makes it real and interesting for them.
Getting kids to ask questions makes them more involved in learning. This way, science becomes a fun adventure. As they learn about Diffusion, they get excited to discover more about the world.
Diffusion Explanation for Kids: Experiments to Try
Engaging kids with easy experiments on Diffusion for children makes learning fun and memorable. Hands-on activities let children see diffusion in action. Here are simple experiments to help illustrate this fascinating process.
Using Food Coloring in Water
Using food coloring in water is a simple way to show diffusion. Fill a clear glass with warm water and add a few drops of red food coloring. Kids will watch as the color spreads throughout the water.
This shows that warmer temperatures make particles move faster, leading to quicker dispersion.
Making a Cup of Tea as a Demonstration
Making tea is a great way to demonstrate diffusion. When a teabag is dipped into hot water, children see the water change color as the tea infuses. This shows how particles move from high concentration to low concentration.
The Squash Experiment
This experiment uses a piece of squash to show diffusion. Place a piece of fresh squash in a bowl of colored water. Kids will see the color move into the squash over time.
This shows how particles travel from high to low concentration. Using different squash shapes and sizes can show how these affect diffusion rates. This makes understanding the concept more interactive.

These hands-on experiences help kids understand diffusion better while keeping them excited about science. For more ideas, visit this resource for kids . It offers engaging ways to teach complex concepts.
Teaching Children About Diffusion Through Stories
Storytelling is a great way to make hard science topics easier to understand. It makes learning fun and sparks curiosity. By telling stories about molecules, kids can better understand Diffusion. Using stories and analogies helps turn complex ideas into something they can picture.
Creating a Story of Molecules
Picture a city full of tiny molecules with their own lives. Some molecules love to be social and move fast. Others like to stay close to home, creating a lively city.
This story helps kids see how Diffusion works. It shows how substances move from where there’s a lot to where there’s little. It makes learning about Diffusion fun and easy.
Using Analogies and Metaphors
Analogies make hard ideas easier to picture. For example, comparing Diffusion to a dance party helps kids see how molecules spread out. When kids dance close and then move apart, they’re showing how Diffusion works.
This makes the idea stick in their minds. Adding hands-on activities helps too. Kids can watch how food coloring spreads in water, showing Diffusion in action. For more help, check out useful lesson plans and activities.
Engaging Kids in Learning About Diffusion
Learning about diffusion can be exciting for kids. Using games and activities makes it fun. Kids get to explore and discover through hands-on experiences.
Interactive demonstrations help them understand science better. They also spark a deep interest in science.
Incorporating Games and Activities
One fun way to teach kids about diffusion is the Skittles experiment. Warm water is poured over Skittles, showing how colors spread. This activity makes kids more excited about science.
It shows how diffusion works in a fun way. 80% of kids got more interested in science after this.
- Engagement through games: Role-playing diffusion scenarios.
- Hands-on experiments: Using everyday materials like Skittles to demonstrate diffusion effectively.
- Creative activities: Crafting visual aids or posters about diffusion to encourage teamwork.
Using Technology and Virtual Labs
Technology is key in today’s education. Virtual labs let kids experiment with diffusion safely. They see how temperature changes diffusion rates.
Teachers say using tech in science classes boosts student interest by 60%. Kids love exploring with digital tools. It makes learning about diffusion more exciting.
How Diffusion Works in Real Life
Learning about diffusion helps us see the beauty in nature and our daily lives. It shows up in how plants take in carbon dioxide and make oxygen for us. This process is key for life, moving gases from high to low concentrations.
Applications in Nature and Everyday Life
Diffusion is crucial in animals too. It brings oxygen into our lungs, giving our bodies the energy they need. It also lets cells talk to each other and move molecules around. Things like perfume spreading or sugar dissolving in water show how it works in our world.
Diffusion in Plants and Animals
Diffusion does more than just basic tasks; it helps nutrients and waste move in our bodies. For example, osmosis, the movement of water, works with diffusion to keep cells balanced. This helps kids see how everything in life is connected. For more info, check out this page on living systems and diffusion.
Check Out These Related Posts...

Explaining Bioluminescence to Kids: A Glowing Guide
Did you know that about 75% of ocean animals can light up when they're disturbed? This shows how amazing...

Explaining Bioinformatics to Kids: A Simple Guide
Did you know that nearly 45% of elementary and middle school teachers find it hard to teach life sciences? This shows...

Explaining Biotic Factors to Kids: Simple Guide
Did you know that over 90% of Earth's living things are biotic factors? These include animals, plants, and tiny...
Submit a Comment Cancel reply
Your email address will not be published. Required fields are marked *
Save my name, email, and website in this browser for the next time I comment.
Submit Comment
- STEM Ambassadors
- School trusts
- ITE and governors
- Invest in schools
- Student programmes
- Benefits and impact
- Our supporters
- Advertising and sponsorship
- Become a STEM Ambassador
- Request a STEM Ambassador
- Employer information
- Training and support
- STEM Ambassadors Partners
- Working with community groups
- Search icon
- Join the STEM Community
This list provides a range of activities and demonstrations, together with background information and suggested teaching strategies, which explore diffusion. The use of models and analogies here can aid understanding and students should be challenged to use a simple particle model to explain what they observe.
The resources link to the following topics:
- diffusion in terms of the particle model
- diffusion in liquids and gases driven by differences in concentration
- Brownian motion in gases
Visit the secondary science webpage to access all lists: www.nationalstemcentre.org.uk/secondaryscience
Whilst this list provides a source of information and ideas for experimental work, it is important to note that recommendations can date very quickly. Do NOT follow suggestions which conflict with current advice from CLEAPSS, SSERC or recent safety guides. eLibrary users are responsible for ensuring that any activity, including practical work, which they carry out is consistent with current regulations related to health and safety and that they carry an appropriate risk assessment. Further information is provided in our Health and Safety guidance.
Quality Assured Category: Physics Publisher: Longman
Although slightly dated, this pupil book and teacher guide has some really well explained theory and good practicals that fit in with this topic. Each chapter also has a series of good written activities that could be taken and re-purposed in a more up to date way.

Perfumes and Smelling
Quality Assured Category: Science Publisher: Association for Science Education (ASE)
This is a really good set of activities based around perfumes. There are instructions for a perfume circus activity which would make a good starter activity and also for two different ways of making perfume as class practicals. There are full teacher and technician notes and a set of student worksheets.

Diffusion with jelly cubes
In this experiment, students can investigate diffusion by placing agar cubes of varying sizes in acid and observing the colour change. The webpage contains full teacher and technician notes.
Diffusion in liquids
In this experiment, students place colourless crystals of lead nitrate and potassium iodide at opposite sides of a Petri dish of de-ionised water. As these substances dissolve and diffuse towards each other, students can observe clouds of yellow lead iodide forming, demonstrating that diffusion has taken place.
Brownian Motion
Quality Assured Category: Physics Publisher: National STEM Learning Centre and Network
This video shows how to show the movement of particles by Brownian motion. Instead of using the traditional smoke cell, the video shows how Brownian motion can be observed in a suspension containing micrometre diameter polystyrene spheres. Using a microscope and video camera, students can observe the motion of the polystyrene spheres. The video also shows how Brownian motion can be simulated using a vibrating loudspeaker, table tennis balls and a small balloon.

The Biology Corner
Biology Teaching Resources

Observing Diffusion Using Iodine and Plastic Bags
Most chapters follow the cell structure topic with one on the cell membrane and diffusion and osmosis. These concepts can be very difficult for students to understand.
In order to give them a view of how diffusion works with a semipermeable membrane, I like to do a lab that uses a plastic bag to model the cell (membrane).
It is a simple lab where students do very little except watch the process and record data and information. To set it up, you will need plastic bags, iodine, water, and corn starch. All except iodine are readily available at the supermarket.
Student handout includes instructions, pre-lab questions, and an analysis section.
Setting Up the Lab
First, add a spoonful of cornstarch and about 100 ml of water in a cheap plastic bag. (You don’t need to be exact!) Tie the top of the bag like a balloon. I like to do at least one of these while the students watch. Then I give them prepared bags because it takes too long (and is messy) for students to do this step.
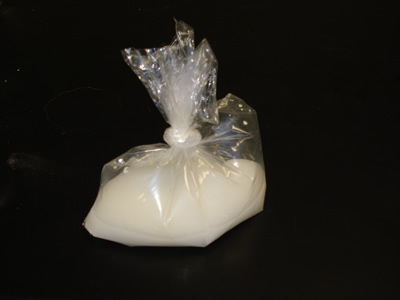
Tell the students that the bag represents a cell, with the cytoplasm being the cornstarch mixture and the plastic is the cell membrane. Explain that solid objects are not really solid at a molecular level and that the bag is more like a tiny little screen door. If molecules are small enough, they can pass right through the bag.
With the baggie in place, you will need to prepare enough beakers for your entire class. Fill them about half full and add several drops of iodine , You want the water to be very orange. The more concentrated the mixture, the faster the reaction.

Observations and Analysis
Explain that iodine is an “INDICATOR” in that it will change color whenever it encounters starch. You can demonstrate this with a beaker of starch solution and a drop of iodine. Usually students are fascinated by the quick and dramatic color change!
Finally, students will carefully place the baggie into the iodine mixture. Their worksheet will ask them to make some predictions about what will happen and to define diffusion and osmosis. The process should take about 15 minutes and students should notice a change in the color of the corn starch in the bag.
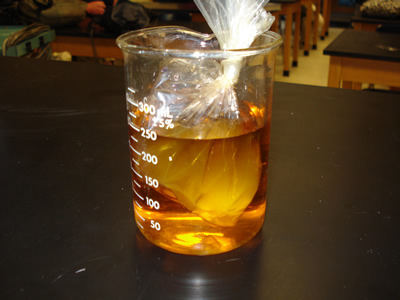
After 15 Minutes….
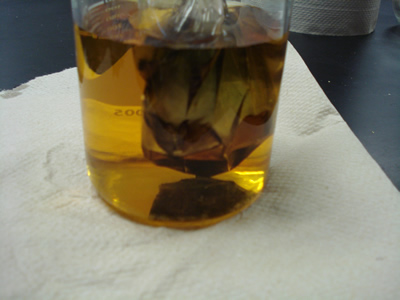
Students will then be asked on the worksheet to explain what happened. A common misconception is that the iodine “ate” through the bag. Remind students that the bag is like a screen door and iodine is a very small molecule.
Despite the fact that this lab is not very interactive, students do seem to understand the cell model and semi-permeable membranes after completing it. Many will ask to see what will happen if you put the starch in the beaker and the iodine in the bag. You can set this up for them and they can view the results the next day.
Shannan Muskopf
DIY: Diffusion Science Experiment
September 7
Related Posts

How To Make a Battery
How to Find the Best Sleep Away Camp in California for Your Child
How does a speaker work.

Diffusion Experiment
Diffusion is the process of something moving from one place to another in a medium such as air or water.
It’s a common process in everyday life.
When mom is cooking pancake in the kitchen, you can smell it all the way upstairs in your bedroom.
If you put a drop of water color into a glass of water , all the water will turn into that color eventually even if you don’t stir it.
All of these are possible because of diffusion.
Here is an experiment you can see diffusion in action.
In addition to diffusion, it also shows how insolubility and density work.
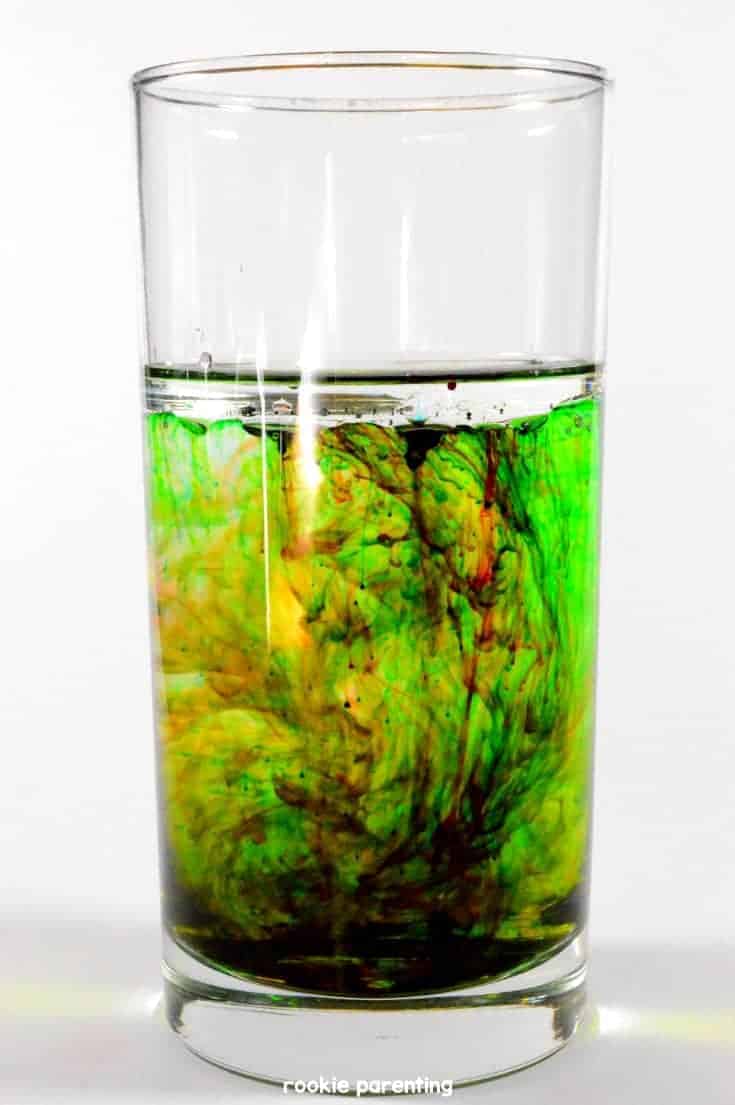
Diffusion Science Experiment
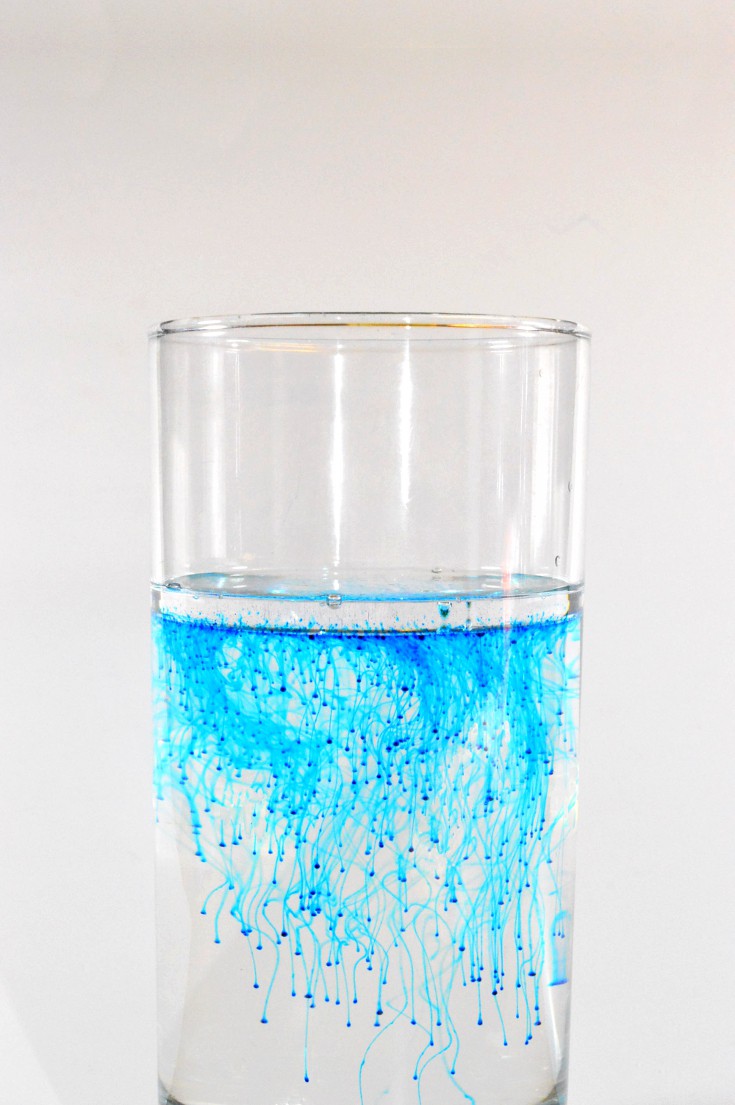
In this diffusion science experiment, which my kid preferred calling it "fireworks" or "falling rainbow" in a glass, you can watch color dance gracefully in the water.
- baby oil or vegetable oil
- food coloring
- adult supervision
Instructions
- Fill one glass with water to 3/4 full.
- Pour baby oil into another glass to about half an inch high.
- In the baby oil, add food coloring of different colors.
- Using a stirrer, break the food coloring into tiny droplets, but do not mix the colors unless you want a dancing mixed color.
- Empty the baby oil and the food coloring droplets into the other glass and watch the color dance (or the fireworks go off, or the rainbow color falling, whichever suits your preference. :) )
Recommended Products
As an Amazon Associate, I earn from qualifying purchases.

Did you try this project?
Follow us on Pinterest and share a photo!
There are several scientific observations you can make in this experiment (and show your preschoolers).
Insolubility
First, baby oil and water don’t mix.
As you pour the oil into the water, you can see it sink into the water due to gravity and momentum.
But instead of mixing into the water, the oil forms a bubble and the bubble eventually floats back to the surface .
These two fluids don’t mix because oil is made up of non-polar molecules while water highly polar molecules.
Oil is said to be insoluble in water.
Second, the baby oil floats to the surface because of the difference in densities .
Oil has a lower density than water.
Lower density fluid floats on top of higher density fluid .
On the other hand, food coloring has a higher density than oil.
So when the oil/coloring mixture is poured into the water, the coloring stays up inside the oil for a little while.
Eventually, it sinks below the oil and dissolves in the water because unlike oil, food coloring is soluble.
Now comes the dancing . What is it?
The food coloring and the water are going through a process called diffusion – movement of molecules from a region of high concentration to a region of low concentration .
The concentration of the coloring is highest near the oil layer.
The coloring’s molecules randomly move towards the bottom where the concentration of the coloring is the lowest.
Because the molecules move somewhat randomly (with gravity pulling them downward), they leave behind trails of color as they diffuse.
Given enough time, the food coloring will mix thoroughly with the water evenly.
Similar Posts

Gravity And Magnetism Experiment
Normally, paper clips do not fly into a hand that hovers over them. That is because the gravitational force pulls…
Can You Make Rain?
Can you make rain in your own home? This is a rain making experiment that simulates how rain forms. A…
Water Pressure Experiment
Pressure is the amount of force that is exerted on something. Gravity causes pressure naturally. Water pressure is the force created…

Life Cycle of Silkworm
Silkworms are native in China. They spin cocoons of fine, strong and lustrous fiber which can be used to produce…

Salt Water Density Experiment
Do grapes sink or float? Grapes can do both. Whether a grape sinks or floats depends on its density relative…

Shadow Drawing For Kids
This is a fun and simple way to teach kids about light and the basics of how light works. Under…

COMMENTS
In one glass, pour the cold water and in the other hot water. As we mentioned, near-boiling water for hot and regular temperature water from the pipe will be good to demonstrate the diffusion. Drop a few drops of food coloring in each cup. 3-4 drops are enough and you should not put too much food color.
Diffusion is the movement of a substance from an area of high concentration to an area of low concentration. Diffusion occurs in gases and liquids. Particles in gases and liquids move around randomly, often colliding with each other or whatever container they are in. When they collide they change direction which means eventually they spread out ...
In this video, we demonstrate a simple Diffusion experiment you can easily do at home.All you need is 2 Glasses, Hot and Cold Water, and some food colors.Thi...
First of all, I made sure that I had 3 regular spoons for 3 food coloring drops. •2. Next, I Made sure that every water was in the right temp where one boiled water, one room temp 30 C and one cold water approximately 15 Degrees and they were all 300 ml. •3. Then I prepared the timer for 5 mins. •4.
Before initiating the experiment, take an image with something of a known size. For example, taking a picture of a ruler would be useful. You'll see more about why this is needed in step 6. Initiate the experiment and wait. Take the time and follow the images over your google-drive folder.
It shows how diffusion works in a fun way. 80% of kids got more interested in science after this. Engagement through games: Role-playing diffusion scenarios. Hands-on experiments: Using everyday materials like Skittles to demonstrate diffusion effectively. Creative activities: Crafting visual aids or posters about diffusion to encourage teamwork.
Diffusion. This list provides a range of activities and demonstrations, together with background information and suggested teaching strategies, which explore diffusion. The use of models and analogies here can aid understanding and students should be challenged to use a simple particle model to explain what they observe.
Many will ask to see what will happen if you put the starch in the beaker and the iodine in the bag. You can set this up for them and they can view the results the next day. Use simple materials to model diffusion. Place corn starch in a bag and then submerge into a solution of iodine. The iodine will cross into the bag and turn the starch purple.
Here is a simple DIY experiment for you to try to demonstrate factors that affect diffusion. Diffusion is the movement of a substance from an area of a high concentration to an area of low concentration. All you will need for this experiment are a few glasses of water and some food coloring. We will be looking at the diffusion of the food ...
Instructions. Fill one glass with water to 3/4 full. Pour baby oil into another glass to about half an inch high. In the baby oil, add food coloring of different colors. Using a stirrer, break the food coloring into tiny droplets, but do not mix the colors unless you want a dancing mixed color. Empty the baby oil and the food coloring droplets ...