

How To Make Speech Bubbles Using The Custom Shape Tool In Photoshop
- Updated on September 3, 2020
Speech bubbles are useful for conveying ideas in design and are used frequently in web, graphic and logo design and also as icons. Photoshop CC comes with a set of speech bubble shapes just waiting for you to use them, but they are hidden away a little bit. I’ll show you how to find them and how to add them to your designs and change their colour.
Photoshop Shape Tools
Photoshop comes with five basic shape tools – the Rectangle Tool, the Rounded Rectangle Tool, the Ellipse Tool, the Polygon Tool, and the Line Tool. These let us add simple geometric shapes like rectangles, squares and circles, as well as stars, starbursts and direction arrows, to our images.
Photoshop also comes has the Custom Shape Tool which allows us to create more interesting and complex shapes such as snowflakes, pawprints, light bulbs and … speech bubbles. The really great thing about all of these tools is that they are Vector drawing tools . ( Learn the difference between Bitmap and Vector images here ).
That means we can make the shapes bigger and smaller without any loss of quality. I’ve added a special cheatsheet to this post – a three page PDF which includes a Custom Shape Quickstart and a visual guide to all of Photoshop’s Custom Shapes. Download it below or at the end of the post.
Download My Photoshop Custom Shapes Cheatsheet
How to use the custom shape tool in photoshop.
2. On the Options bar at the top of the screen, make sure the first drop down option is set to Shape . This ensures that you are creating vector shapes which will either be filled with the colour and/or stroke colour you choose. Next, select a Fill colour. In this example, I’m using red. Leave the Stroke colour as empty and ignore the rest of the options except the actual Shape option. Click on the Shape drop down box and choose the Talk Bubble.

3. Drag out the shape in your image window. Hold down Shift as you drag to constrain the proportions of the bubble, otherwise, it will look stretched and distorted.
When you’ve dragged the speech bubble to the size you want, release the mouse. And there it is!
Changing The Colour Of The Speech Bubble
Ok, now you have a lovely speech bubble, but let’s say red is not your colour. How do you change it? There are two quick ways to change colour of any vector shape that you draw in Photoshop.
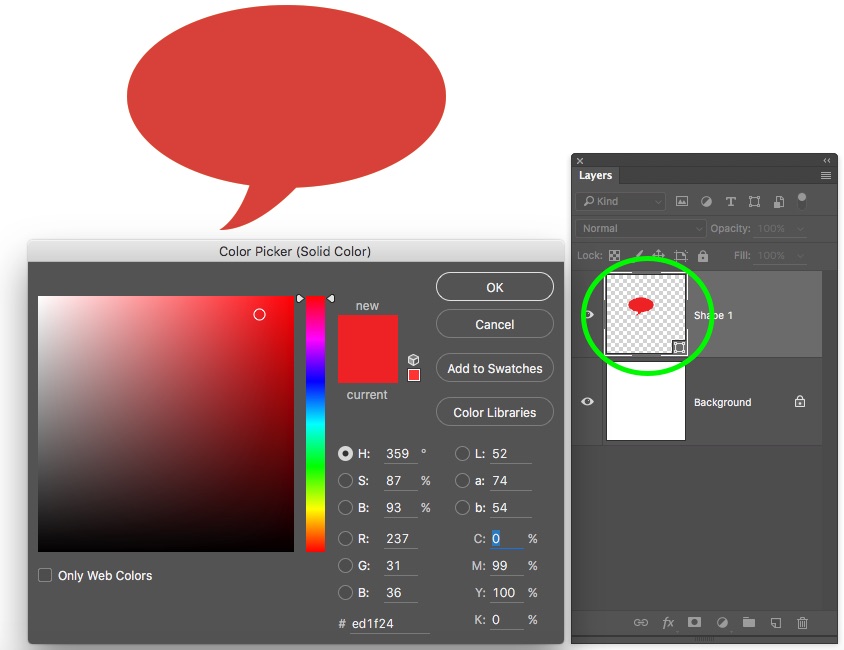
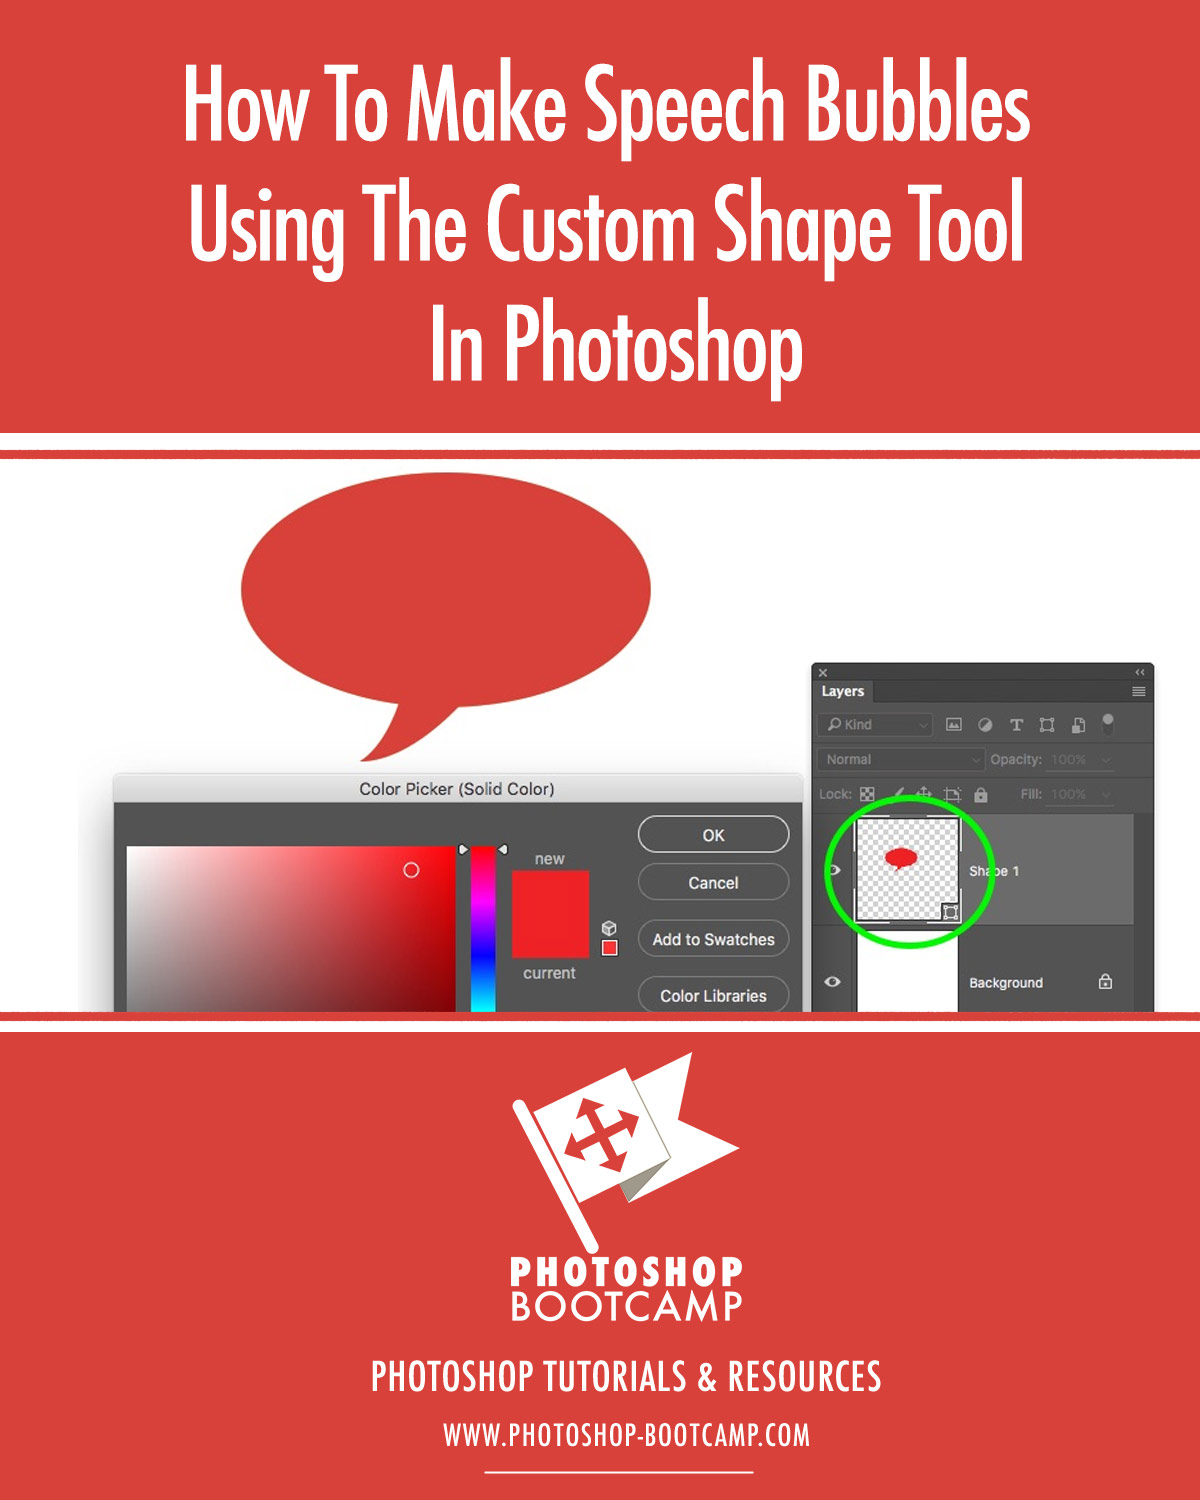
1.In the Layers panel, double-click on the thumbnail (highlighted in green below) on the new Shape layer that you’ve just created. This will open the Photoshop Color Picker box.
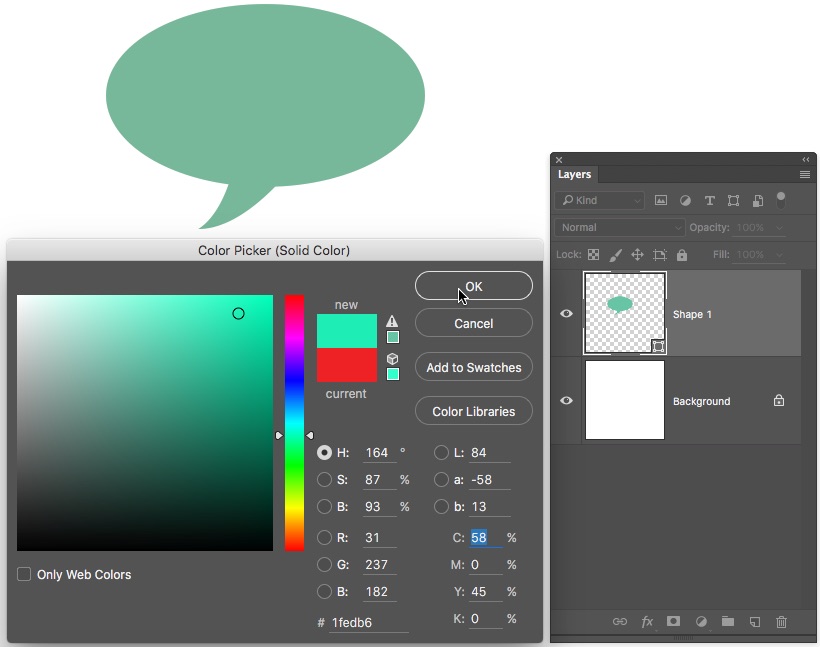
Simply choose whichever colour you like best by picking a base colour in the tall colour slider strip, and then click in the main colour field to choose how light or dark that colour will be. You’ll notice that the nice thing about shape layers is, when you double-click on their thumbnail to change colour, you can try out lots of colours before clicking OK as the changes will happen as you move around the colour picker. When you are happy with your colour click OK .
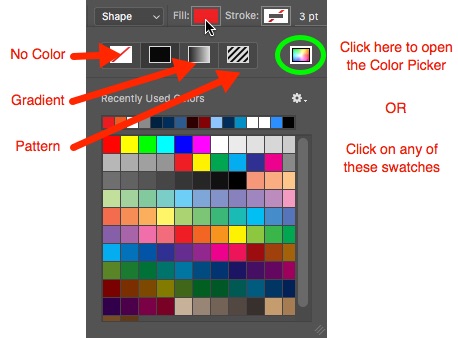
2. An alternative way to change colour is this: First make sure that the speech bubble is selected (it is selected when you can see the path and the anchor points of the shape). Then on the Options bar at the top of the screen, click on the Fill colour. You can choose to have No Color, which is the first option, a solid color, a gradient or a pattern. By default, the solid color is selected and when you choose one of the swatches below, it will instantly change to that colour. If you don’t see a color you want in the swatches you can also choose to click on the Color Picker option which opens the usual Photoshop Color Picker.
How To Make A Speech Bubble With A Stroke Around It Rather Than A Fill
If you want only a coloured stroke around a speech bubble but no fill colour inside it, you can quickly set that up in your Options bar at the top of the screen in Photoshop.
1.With the Custom Shape Tool selected as before, go to the Options bar. Click on the Fill colour and set it to No Color (as shown above), then click on the Stroke option and choose the color you want using either the Swatches in the drop-down box or the Color Picker as above.

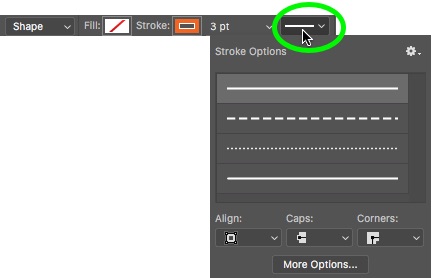
3. You also have a choice of solid, dash or dotted lines on your stroke. To change the Stroke type, click on the drop down and choose the style you like.
How To Find More Speech Bubble Shapes
Now you know how to create and modify a vector speech bubble, you might be wondering if that is the only speech bubble shape available in Photoshop? Well no, there are actually quite a few more hidden away for us to play with. Here’s how we get to them:
1.With the Custom Shape Tool selected, in the Options bar at the top of the Photoshop screen, click on the Shape drop down. Then click on the sub-menu (it looks like a cog wheel) and choose Talk Bubbles .
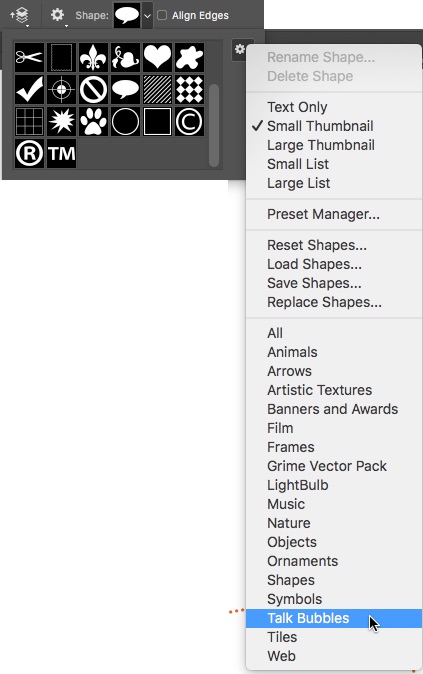
2. A dialog box will open asking if you want to Replace or Append the current set of Shapes. I usually choose Append, and this adds the new set of shapes to the end of the currently visible shapes.
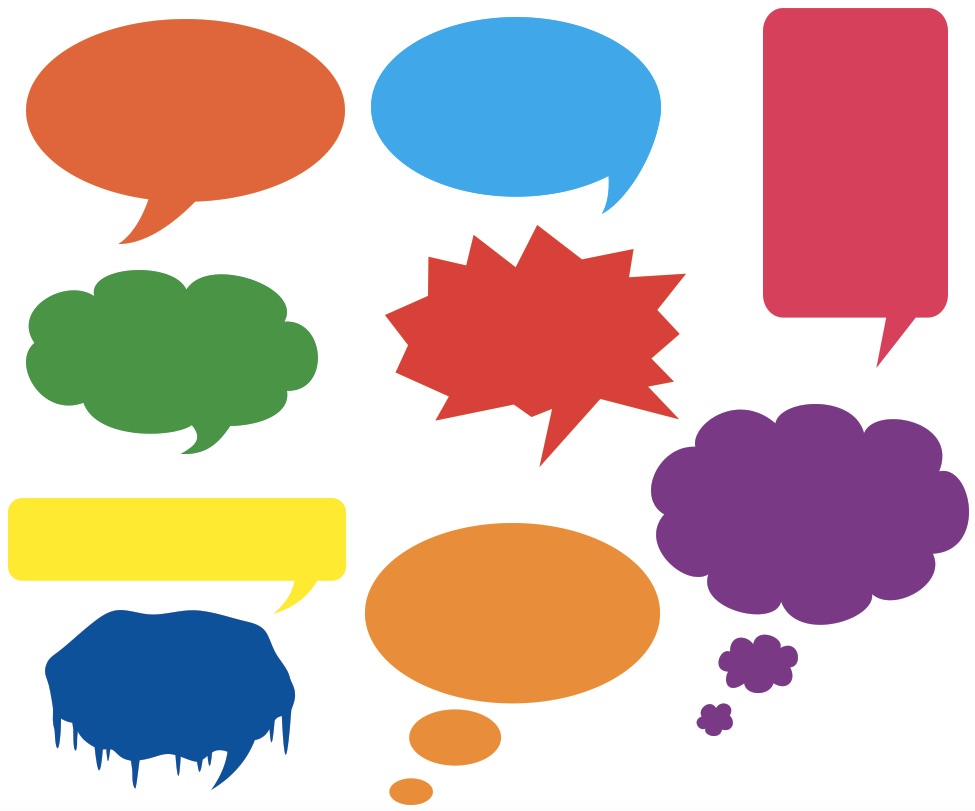
3. Now scroll down through the shapes and you’ll see a lovely set of speech bubbles.
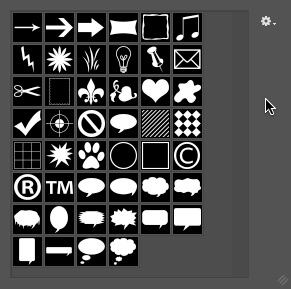
4. Click on the bubble you want to draw and then click and drag out the shape on the image window. Remember to hold down Shift to constrain the proportions on the bubble.
Try out different shapes, different colours and different strokes.
I hope you’ve found this useful. If you have any questions please put it in the comments below and I’ll do my best to answer it.
Download my Photoshop Custom Shapes Cheatsheet
The three-page cheat sheet gives you a quick start to working with photoshop’s custom shape tools and a visual guide to every shape that comes with photoshop..
I hope you’ve found this Photoshop’s tutorial useful and I would be really grateful if you would share it. Thank you so much! 🙂
Jennifer Farley
My name is Jennifer Farley. I'm an Irish author, illustrator, designer, and design educator. I've been teaching and working in the design field for over 20 years. I help people learn Adobe Photoshop, Lightroom, Illustrator and Graphic Design.
Photoshop Bootcamp is a growing collection of my Photoshop tutorials and lessons I've written for my students.
Leave a Reply Cancel Reply
Your email address will not be published. Required fields are marked *
Name *
Email *
Add Comment *
Post Comment
This site uses Akismet to reduce spam. Learn how your comment data is processed .
Trending now

Last Updated on September 3, 2020
- Global community
- 日本語コミュニティ Dedicated community for Japanese speakers
- 한국 커뮤니티 Dedicated community for Korean speakers
- Photoshop ecosystem
- Discussions
- Re: How can I Add a Speech Bubble in Pictures?
How can I Add a Speech Bubble in Pictures?
Copy link to clipboard
1 Correct answer
Explore related tutorials & articles

never-displayed
How to Create Speech Bubbles in Photoshop: Detailed Tutorial
By Tata Rossi 22 days ago, Software Reviews
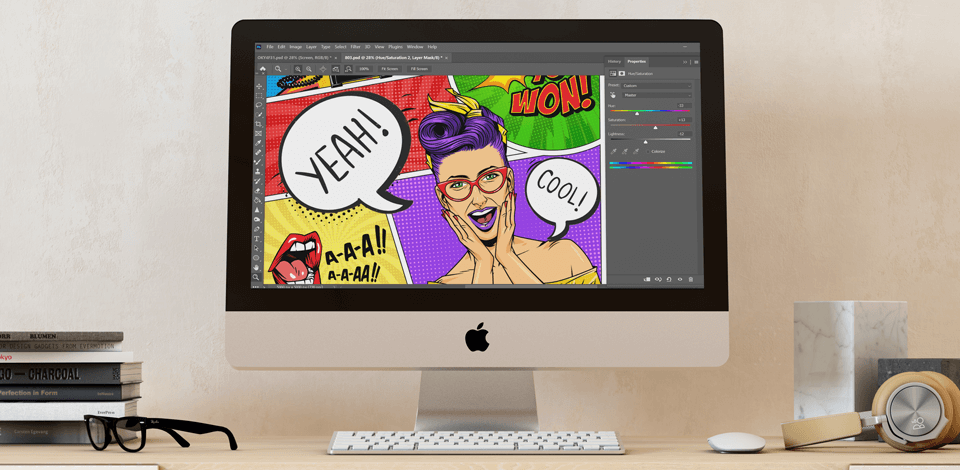
Speech bubbles come in handy in various designs. Whether you're working on a comic book, manga, pop art poster, or even a sticker design, it may be necessary to include word bubbles in your project.
STEP 1. Load Legacy Shapes
If you haven't uploaded legacy shapes yet, you should start with this step. Open the Shapes panel (Window > Shapes), hit the menu button in the upper side of the panel, and choose Legacy Shapes and More .
You'll find the Legacy Shapes and More folder at the bottom of the list in the Shapes panel. But keep in mind that this feature is only accessible if you're using the most recent version of Photoshop.
STEP 2. Create Speech Bubble Path
Click on the Custom Shape Tool (or hit U for instant access) in the toolbar on the left, and pick "Path" from the dropdown in the Options bar. After that, go for a speech bubble shape by navigating to the Options bar or the Shapes panel (Window > Shapes) under Legacy Shapes and More > All Legacy Default Shapes > Talk Bubbles.
Select the shape style that suits your picture content, depending on whether you want to create memes, make designs, or draw manga in Photoshop .
STEP 3. Place the Shape on the Canvas
After choosing your speech bubble shape, click and drag on the canvas to form the path for your speech bubble.
STEP 4. Add a Fill to the Path
When you add speech bubble to image, you first need to click the Create a New Layer icon at the bottom of the Layers panel. After that, double-click on the layer name and switch it up to Fill. Following that, choose either the Path Selection Tool (A) or the Direct Selection Tool (A), right-click on the canvas, and choose the Fill Path option.
While in the Fill Path dialog, choose Foreground Color . The color doesn’t matter much right now. We’ll guide you on how to modify it later. At this point, your speech bubble should be filled with the Foreground color.
STEP 5. Choose the Brush for Outline
Create a new layer and name it Outline. Open the Brushes panel (Window > Brushes) and choose the brush you want to use for outlining your speech bubble. If you're after something unique when you make a speech bubble in Photoshop, you can look for more brushes on the web. Once you find something suitable, you can install brushes in Photoshop .
If you want to tweak the brush size, head to the Brushes panel. It is possible to change even advanced brush settings within the Brush Settings panel.
STEP 6. Add an Outline to the Speech Bubble
Choose either the Path Selection Tool (A) or the Direct Selection Tool (A). Next, right-click on the canvas and select Stroke Path .
STEP 7. Check the Stroke Path Dialog
Make sure you've picked the Brush tool in the Stroke Path dialog. If everything is done properly, your speech bubble will have an outline.
STEP 8. Apply Styles to the Outline and Fill Layers
Now, apply styles to our layers. This way, we can easily switch up their looks whenever we want. Just double-click on the Fill layer for that.
STEP 9. Open the Layer Style Dialog
Make sure you've turned on Preview in the Layer Style dialog, and then select Color Overlay . Click on the color icon to choose a new color, and you'll see the fill color of the speech bubble change right at that moment.
When making word bubbles in Photoshop, it is also possible to add Color Overlay for the Outline layer to alter the color of the speech bubble's outline. Once the layer styles are applied, you can easily tweak them by double-clicking on a layer style in the Layers panel.
10. Add Text to the Bubble
Choose the Horizontal Type Tool (T), click outside the speech bubble shape, and type in your text. Turn on Free Transform (Ctrl/Cmd + T) to adjust the text size using the handles on the bounding box and move the text around by clicking and dragging. Hit Enter to accept the changes.
Feel free to customize the text further by making adjustments in the Character and Paragraph panels. You can also experiment with applying various Photoshop text effects .
Free Bonus Tools for Your Text
If you need to add text to your speech bubbles, these beautiful fonts can come in handy. Rather than just slapping on the first font you find, look for a proper font that will seamlessly complement your graphic design style.
- How to create speech bubbles
- Bonus tools

- Video Editing Services
- Virtual Staging Services
- Outsource Photo Editing
- Retouching Tips
- Photo Editing Freebies
- Free Raw Images for Retouching
- Free Photoshop Actions
- Free Lightroom Presets
- Affiliate Program
- Privacy Policy
- Cookie Policy

How to Create a Speech Bubble in Photoshop CS5: A Step-by-Step Guide
Creating a speech bubble in Photoshop CS5 is a simple process that involves using the ellipse tool to create the bubble shape, adding a tail with the polygonal lasso tool, and then adding text with the text tool. After completing these steps, you’ll have a speech bubble that you can customize and use in your designs.
After you complete the action of creating a speech bubble, you can then adjust the size, color, and position of the bubble to fit your needs. You can also add effects like drop shadows or strokes to make the bubble stand out more.
Introduction
Speech bubbles are a fun and creative way to add dialogue or thoughts to your images. They’re often seen in comic strips and graphic novels, but they can also be used in advertisements, social media graphics, and more. If you’re using Photoshop CS5, creating a speech bubble is a breeze and can add a whole new level of engagement to your visuals.
Whether you’re a graphic designer, a social media manager, or just someone who likes to get creative with their photos, knowing how to create a speech bubble in Photoshop CS5 can be a valuable skill. It allows you to convey messages in a unique and eye-catching way, helping your content to stand out from the crowd. Plus, it’s a lot of fun!
Step by Step Tutorial: Creating a Speech Bubble in Photoshop CS5
Before we dive into the steps, know that by the end of this tutorial, you’ll be able to create a basic speech bubble that you can customize to your liking.
Step 1: Select the Ellipse Tool
From the toolbar, select the Ellipse Tool to draw the main bubble shape.
Drawing a perfect circle can be tricky, but holding down the ‘Shift’ key while dragging will keep your bubble’s proportions even. You can also fill the bubble with a color of your choice by setting the foreground color before drawing.
Step 2: Draw the Bubble Tail
Use the Polygonal Lasso Tool to draw a triangle shape that will serve as the tail of the speech bubble.
Make sure to draw the tail close to the bubble and keep the base of the triangle wide for a natural look. After completing your selection, fill it with the same color as the bubble.
Step 3: Add Text
Select the Text Tool and click inside the bubble to start typing your dialogue or message.
Choose a font that complements the mood of your image and adjust the size to ensure it fits nicely inside the bubble. Remember to center the text for a polished appearance.
Additional Information
Creating a speech bubble in Photoshop CS5 is just the beginning. You can experiment with different shapes for the bubble, like clouds or ovals, for a different effect. You can also play around with layer styles to add depth to your bubble, such as a drop shadow or an outer glow. Remember, the key to a great speech bubble is readability, so choose colors and fonts wisely.
Another tip is to pay attention to the placement of the bubble tail. It should point towards the person or object that is ‘speaking.’ This can help to avoid confusion and make your image’s message crystal clear. Lastly, don’t forget that practice makes perfect. The more you work with speech bubbles, the better you’ll become at integrating them seamlessly into your designs.
- Select the Ellipse Tool.
- Draw the Bubble Tail.
Frequently Asked Questions
What size should i make my speech bubble.
The size of your bubble should be proportionate to the image and the amount of text you want to include. Not too big, not too small.
Can I add a stroke or outline to my speech bubble?
Yes, you can add a stroke by double-clicking on the bubble layer and selecting ‘Stroke’ from the Layer Style options.
How do I make sure my text is centered in the bubble?
After typing your text, use the alignment tools in the options bar at the top of Photoshop to center it horizontally and vertically.
What if I want a different shape for my speech bubble?
You can use any of the shape tools in Photoshop or even draw a custom shape with the Pen Tool.
Can I use speech bubbles in professional designs?
Absolutely, as long as it fits the style and tone of the project. Speech bubbles can add a playful touch to advertisements, social media posts, and more.
Creating a speech bubble in Photoshop CS5 is a simple yet effective way to make your images communicate more effectively. It’s perfect for adding dialogue, thoughts, or even sound effects to your designs, and the customization options are nearly endless.
Whether you’re a seasoned designer or just starting out, mastering the art of the speech bubble can add a new layer of creativity to your work. So why not give it a try? Who knows, you might just find yourself speechless at how much impact a little bubble can make!

Matt Jacobs has been working as an IT consultant for small businesses since receiving his Master’s degree in 2003. While he still does some consulting work, his primary focus now is on creating technology support content for SupportYourTech.com.
His work can be found on many websites and focuses on topics such as Microsoft Office, Apple devices, Android devices, Photoshop, and more.

Share this:
- Click to share on Twitter (Opens in new window)
- Click to share on Facebook (Opens in new window)
Related Posts
- How to Make Text Vertical in Google Docs
- How to Draw an Arrow in Photoshop CS5: A Step-by-Step Guide
- How to Flip an Image in Google Docs
- How to Rotate Text in Adobe Photoshop CS5: A Step-by-Step Guide
- How to Change Canvas Size in Photoshop CS5: A Step-by-Step Guide
- Photoshop Rounded Rectangle: A Step-by-Step Guide to Creating One
- How to Make a Background White in Photoshop CS5: A Step-by-Step Guide
- How to Flip a Layer in Photoshop CS5: A Step-by-Step Guide
- How to Add Someone to a Group Text with iPhone and Android
- How to Remove Page Number from First Page of Google Docs and Google Sheets
- How to Change the Color of a Selection in Photoshop CS5: A Step-by-Step Guide
- How to Resize a Layer in Photoshop CS5: Step-by-Step Guide
- How to Set Google Docs Background Image
- How to Rotate Layers in Photoshop CS5: A Step-by-Step Guide
- How to Add a Text Box in Google Docs
- How to Fill a Background Layer in Photoshop CS5: A Step-by-Step Guide
- iMessage Sent as Text Message on iPhone
- How to Insert a Text Box in Google Docs
- How to Remove Background Color in Google Docs
- Adobe Photoshop: How to Change Ruler Units to Pixels from Inches
Get Our Free Newsletter
How-to guides and tech deals
You may opt out at any time. Read our Privacy Policy

How to create speech bubbles in Photoshop
admin PHOTOSHOP photoshop
Creating speech bubbles in Photoshop is a straightforward process. Here’s a step-by-step guide on how to do it:
Method 1: Custom shape tool
Open photoshop.
Launch Adobe Photoshop on your computer.
Create a new document
Go to File > New to create a new document. Set the dimensions and resolution according to your preferences.
Select the custom shape tool
In the toolbar, find the Custom Shape Tool. It looks like a dashed star or can be hidden under the Rectangle or Ellipse Tool.
Choose speech bubble shape
In the options bar at the top, click the shape thumbnail to open the Shape Picker.
Select the speech bubble shape. If you don’t see it, click the gear icon and choose “Speech Bubbles.”
Draw the speech bubble
Click and drag on your canvas to draw the speech bubble. Hold the Shift key while dragging to maintain proportions.
Adjust the shape
Once the speech bubble is drawn, you can use the Move Tool (V) to adjust its position and the Direct Selection Tool (A) to modify its shape.
Select the Text Tool (T) and click inside the speech bubble to add text. Adjust the font, size, and color as needed.
Method 2 – Custom shape with pen tool: Photoshop
Open Photoshop and Create a New Document.
Select the pen tool
Choose the Pen Tool (P) from the toolbar.
Click to create anchor points around the speech bubble shape. Adjust the curves using the handles.
Complete the path
Close the path by connecting the last anchor point with the first one.
Add a stroke
In the Paths panel, right-click on the path and choose “Stroke Path.” Select a brush or pencil and click OK.
Adjust the stroke
Use the Direct Selection Tool (A) to modify the shape and position of the stroke.
Select the Text Tool (T) and click inside the speech bubble to add text.
Adjust text and style
Modify the text properties such as font, size, and color.
Method 3 – Use a shape layer: Photoshop
Open photoshop.
Create a new document.
Select the ellipse tool or rectangle tool
Choose the ellipse tool (U) or rectangle tool (U) from the toolbar.
Draw the base shape
Click and drag to draw a shape that will serve as the base of the speech bubble.
Modify the shape
Use the Direct Selection Tool (A) to adjust the shape by dragging anchor points.
Use the Pen Tool (P) to draw a triangular tail extending from the speech bubble.
Modify the text properties such as font, size, and color. Want to read the more related articles let’s explore the best hiking photography ideas.

Related Posts

Best Cameras for Movie Production
APPLICATION , PHOTOGRAPHY , PHOTOSHOP
Photo Editing Service Dubai
APPLICATION , PHOTOSHOP
How to Create a Black Background for Photos
Old photo restoration, how to put a red filter on the photo.
How to Create a Speech Bubble in Photoshop CS5
A common addition that you might need to make to an image in Photoshop is the addition on some text. You might even need to make it look like someone is saying that text. Therefore you may need to know how ot create a speech bubble in Adobe Photoshop.
While there are a lot of very talented artists that can draw and create almost anything in Photoshop, some of us just don’t have that gift to be able to freely draw on a computer screen. This can extend to even very basic shapes, like a speech bubble.
Every time that I have tried to manually draw a speech bubble, it either looks like a balloon or some weird cloud. Fortunately there is a custom shape tool in Photoshop CS5 that can help to solve this specific problem. So continue reading our brief tutorial below to learn how to create a speech bubble in Photoshop CS5.
As an Amazon affiliate, I earn from qualifying purchases.
How to Create a Speech Bubble in Adobe Photoshop
- Open your image.
- Right-click the Shape Tool and choose Custom Shape Tool .
- Choose the Shape dropdown and select the speech bubble.
- Click the Foreground Color box, choose a color, then click OK .
- Draw the speech bubble on the canvas.
- Select the Move tool and position the speech bubble.
- Click the Type Tool .
- Adjust the Font settings.
- Click inside the bubble and add your text.
Our article continues below with additional information on adding a speech bubble in Photoshop, including pictures of these steps.
Do you ever need to draw a line through email text? Our how to strikethrough in Outlook tutorial will show you how to accomplish that.
How to Make Photoshop CS5 Speech Bubbles (Guide with Pictures)
I am going to be writing this tutorial with the assumption that you want to create a white speech bubble with black text. If not, then you can simply choose a different foreground color for your speech bubble and a different text color for the words that you are putting inside of the speech bubble before you create each respective element.
If the text in the bubble is not in the right location, then you can use the instructions in our how to move text in Photoshop article to relocate it.
Step 1: Open the image to which you want to add a speech bubble.
Step 2: right-click the shape tool in the toolbox at the left side of the window, then click the custom shape tool option..
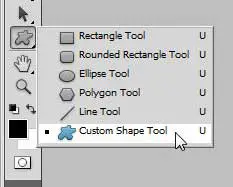
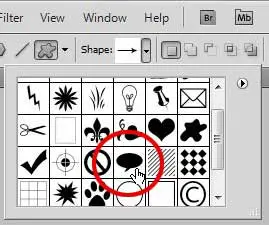
Step 3: Click the drop-down menu to the right of Shape in the toolbar at the top of the window, then click the Speech Bubble option.
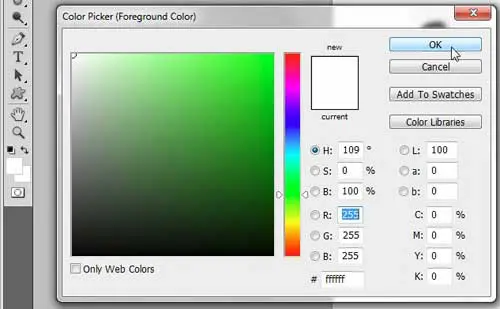
Step 4: Click the Foreground Color box in the toolbox at the left side of the window, click the top-left corner of the color picker to choose the color white, then click the OK button.
Step 5: Click near the location in your image where you want to insert the speech bubble, then drag your mouse to expand the size.
You don’t need to worry too much about being exact with your location, as Photoshop automatically creates the shape on its’ own layer, which allows you to freely move it.
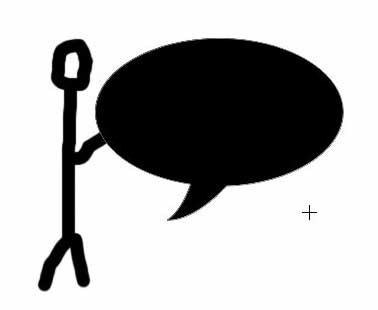
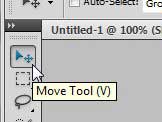
Step 6: Click the Move Tool icon at the top of the toolbox, the click your speech bubble and drag it to the desired location.
Step 7: Click the Type Tool in the toolbox.

Step 8: Choose your font settings using the options in the toolbar at the top of the window.

Step 9: Click inside the speech bubble, then type the text that you want to add.
Depending upon the shape and size of your speech bubble, you may need to add some line breaks and spaces to properly position your text. You can move to a new line by pressing Enter on your keyboard, and you can add spaces by pressing the spacebar .
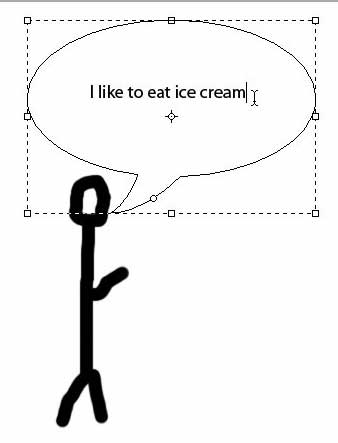
Be sure to save your image once you have finished customizing your speech bubble.
Are you having trouble figuring out how to go back and change the font on text that you have already created in Photoshop? The instructions in this tutorial can be helpful in pointing out the steps that you need to follow in order to edit and customize existing text layers.
Is your computer struggling to run Photoshop as smoothly as you would like? Maybe it’s time to upgrade to a new laptop. There are a number of options available that are both affordable and powerful, including this one available at Amazon.

Matthew Burleigh has been writing tech tutorials since 2008. His writing has appeared on dozens of different websites and been read over 50 million times.
After receiving his Bachelor’s and Master’s degrees in Computer Science he spent several years working in IT management for small businesses. However, he now works full time writing content online and creating websites.
His main writing topics include iPhones, Microsoft Office, Google Apps, Android, and Photoshop, but he has also written about many other tech topics as well.
Read his full bio here.
Share this:
Join our free newsletter.
Featured guides and deals
You may opt out at any time. Read our Privacy Policy
Related posts:
- Animated GIF in Photoshop CS5
- How to Draw a Straight Line in Adobe Photoshop
- How to Insert Text Box in Google Docs
- How to Create Text Bubbles in Microsoft Word: A Step-by-Step Guide
- How to Move a Text Layer in Photoshop CS5
- How to Rotate Text in Adobe Photoshop CS5
- Photoshop Resize Layer Guide
- How to Flip Layer in Photoshop (An Easy 3 Step Guide)
- How to Fill a Background Layer in Photoshop CS5
- Change the Photoshop CS5 Background Screen Color
- How to Create Bubble Letters in Microsoft Publisher: A Step-by-Step Guide
- How to Rotate Layers in Photoshop CS5
- How to Draw in Microsoft Word 2013
- How Do You Add Fonts to Photoshop CS5?
- How to Reset Workspace in Photoshop CS5
- How to Make a Background White in Photoshop CS5
- How to Outline a Selection in Photoshop CS5
- How to Add Text in Photoshop CS5
- How to Change Font in Photoshop CS5
- How to Make All Columns the Same Width in Excel 2013

IMAGES
COMMENTS
Sep 3, 2020 · How To Use The Custom Shape Tool In Photoshop. 1. From the Photoshop toolbar select the Custom Shape Tool It is a hidden tool underneath the Rectangle Tool. Click and hold on the Rectangle on the toolbar and you’ll see the full set of vector drawing tools appear.
Then select a speech bubble shape in the Options bar or the Shapes panel (Window > Shapes). Note: the speech bubble shapes are located by going to the following folders, Legacy Shapes and More>All Legacy Default Shapes >Talk Bubbles. With your speech bubble shape selected, click + drag on the canvas to create your speech bubble path.
Feb 12, 2021 · In this video, you'll learn how to how to create a speech bubbles in Photoshop, how to stylize them, and how to add them to a nice illustration from Envato E...
Aug 9, 2023 · There are many ways you can add speech bubbles. One way is to draw your own using the shape tools; another way is importing an image of a standard empty bubble and adding your own text. Here is a detailed tutorial demonstrating one way you can create bubbles: Photoshop Speech Bubble Tutorial - Youtube. Hope it helps! Clarice
In this Comic Art Tutorial you'll learn how to create word balloons digitally, inside Photoshop. The best approach I've found is to get the dialogue for your...
Feb 12, 2021 · This awesome font will look amazing on any Photoshop speech balloon. Combine it with some vivid colors and effects and your Photoshop speech bubble will be one of a kind. North Boys Font. This playful and layered font is perfect for any type of Photoshop speech bubble or Photoshop speech balloon. Sticky Notes Font
When you add speech bubble to image, you first need to click the Create a New Layer icon at the bottom of the Layers panel. After that, double-click on the layer name and switch it up to Fill. Following that, choose either the Path Selection Tool (A) or the Direct Selection Tool (A), right-click on the canvas, and choose the Fill Path option.
Jan 8, 2024 · Creating a speech bubble in Photoshop CS5 is a simple process that involves using the ellipse tool to create the bubble shape, adding a tail with the polygonal lasso tool, and then adding text with the text tool. After completing these steps, you’ll have a speech bubble that you can customize and use in your designs.
Choose speech bubble shape. In the options bar at the top, click the shape thumbnail to open the Shape Picker. Select the speech bubble shape. If you don’t see it, click the gear icon and choose “Speech Bubbles.” Draw the speech bubble. Click and drag on your canvas to draw the speech bubble. Hold the Shift key while dragging to maintain ...
Mar 8, 2021 · How to Create a Speech Bubble in Adobe Photoshop. Open your image. Right-click the Shape Tool and choose Custom Shape Tool. Choose the Shape dropdown and select the speech bubble. Click the Foreground Color box, choose a color, then click OK. Draw the speech bubble on the canvas. Select the Move tool and position the speech bubble. Click the ...