
FREE K-12 standards-aligned STEM
curriculum for educators everywhere!
Find more at TeachEngineering.org .
- TeachEngineering
- Saltwater Circuit

Hands-on Activity Saltwater Circuit
Grade Level: 8 (7-8)
(two 45-minute periods)
Expendable Cost/Group: US $1.25
Group Size: 3
Activity Dependency: None
Subject Areas: Chemistry, Life Science, Measurement, Physical Science, Science and Technology
NGSS Performance Expectations:

Activities Associated with this Lesson Units serve as guides to a particular content or subject area. Nested under units are lessons (in purple) and hands-on activities (in blue). Note that not all lessons and activities will exist under a unit, and instead may exist as "standalone" curriculum.
- Water Desalination Plant
TE Newsletter
Engineering connection, learning objectives, materials list, worksheets and attachments, more curriculum like this, introduction/motivation, vocabulary/definitions, investigating questions, troubleshooting tips, activity extensions, activity scaling, user comments & tips.

Electrical engineers design and build small- and large-scale electrical systems. In the circuit design sub-discipline of electrical engineering, engineers use their knowledge of the conductivity of materials to design circuit boards that are used in cell phones, TVs, toaster ovens, computers, and uncountable other devices. Understanding the dangers and opportunities of mixing electricity and water helps engineers design for safety as well as creative measurement tools.
After this activity, students should be able to:
- Run an experiment.
- Collect and analyze data.
- Work as part of a team.
Educational Standards Each TeachEngineering lesson or activity is correlated to one or more K-12 science, technology, engineering or math (STEM) educational standards. All 100,000+ K-12 STEM standards covered in TeachEngineering are collected, maintained and packaged by the Achievement Standards Network (ASN) , a project of D2L (www.achievementstandards.org). In the ASN, standards are hierarchically structured: first by source; e.g. , by state; within source by type; e.g. , science or mathematics; within type by subtype, then by grade, etc .
Ngss: next generation science standards - science, common core state standards - math.
View aligned curriculum
Do you agree with this alignment? Thanks for your feedback!
International Technology and Engineering Educators Association - Technology
State standards, colorado - math, colorado - science.
Each group needs:
- 2 large, wooden Popsicle sticks (available at craft stores)
- 4 pieces insulated copper wire, each 4-6 inches (10-15 cm) long
- 3 plastic cups, 16 ounce (473 ml) size
- 2 plastic spoons
- 9-volt battery
- battery cap, usually with red and black wire leads (available at hardware stores)
- 3.7 volt light bulb (available at hardware stores)
- 1 miniature light bulb socket (available at hardware stores; use with the 3.7 volt light bulb)
- eye protection (goggles or safety glasses)
- (optional) multimeter and multimeter leads with alligator clips (available at hardware stores)
- Reflection Worksheet , one per person
- Saltwater Cards , one card per group
- Saltwater Circuit Worksheet (without Multimeter) or Saltwater Circuit Worksheet (with Multimeter) , one per group
For the entire class to share:
- electrical tape
- salt, one 26 oz (737 g) container is enough for all groups, plus some extra
- screwdrivers, to tighten wires in light bulb sockets
- roll of aluminum foil
- triple beam or digital scale, to measure grams of salt
- measuring cups or graduated cylinders, to measure ml of water
- projector, to show the attached Saltwater Circuit Presentation PowerPoint
(Before beginning, gather materials to conduct a classroom demonstration of a saltwater circuit, as described in the Materials List and Procedure sections. Create two saltwater concentrations, one that allows the light bulb to turn on but stay dim and another selected to allow the light bulb to be bright. Suggested concentrations: Solution A: 300 ml water and 1 gram salt. Solution B: 300 ml water and 11 grams salt. Solution A will be much dimmer than Solution B.)
(Also prepare a projector to show the attached Saltwater Circuit Presentation [PowerPoint] at the end of the Introduction/Motivation session.)
Do you think water and electricity should ever be mixed? (Answer: Usually no.) What if you could safely mix water and electricity? Can you think of any cool technologies that could come from this? (Give the students a few minutes to think.) Today, we are going to work on answering this question. In fact, we are going to join water and electricity in a special way that is safe.
Has anyone ever built any type of electrical circuit before? (Pause to give students a minute or two to think about this.) Well, today we are going to build a saltwater circuit and we are going to investigate the conductivity of saltwater. In particular, we are going to answer the question: "How does the amount of salt in a saltwater circuit affect the electric current flowing through the circuit?"
(Conduct the saltwater circuit demo.)
Our question is a scientific question, but it also has an engineering application. After all, engineering is the application of math and science to create technologies that make the world a better place. One engineering application for this science is the development of a tool to test the efficiency of a water desalination plant.
A water desalination plant is a system that takes in saltwater and produces clean drinking water. If one were to design a water desalination plant, a saltwater circuit could be incorporated as a tool to detect the presence of salt at the output of the desalination plant. If the saltwater circuit conducts electricity, then the plant did not remove a significant amount of salt, and if it does not conduct electricity, then the plant did remove a significant amount of salt from the water input.
(Show students the attached Saltwater Circuit Presentation [PowerPoint].)
Saltwater Circuit — A saltwater circuit consists of a battery, wire, light bulb, light bulb socket, and two electrodes (see Figure 1). When the battery is connected and the electrodes are touched together we have a closed circuit and electrons flow from the positive terminal of the battery to the negative terminal of the battery. This flow causes the light bulb to light up. When the electrodes are not touching, the circuit is "open" and electrons do not flow; this is called an open circuit . In our saltwater circuit, the electrodes act as a switch.
If you submerge the electrodes in regular tap water, the light bulb does not turn on because no medium exists to transfer electrons from one side of the water to the other. But if you submerge the electrodes in saltwater, the light bulb turns on. In addition, the amount of salt in the saltwater solution influences how much current flows through the circuit, and in turn, how bright the light bulb glows.
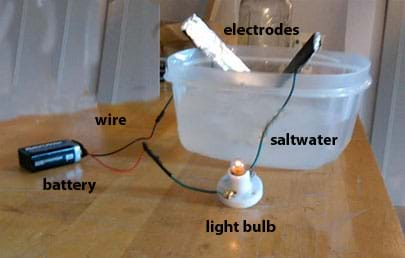
Why Does the Saltwater Circuit Work? — An ion is an atom that has an electrical charge, either positive or negative. Salt molecules are made of sodium and chlorine. When salt enters water, the water causes the salt's sodium and chloride atoms to pull apart and make the salt crystals begin to disappear. As a result, a sodium ion and a chlorine ion are formed. The sodium ion is missing an electron, which gives it a positive change. The chlorine ion has an extra electron, which gives it a negative charge.
When an electric potential is applied, the positively-charged sodium ions are attracted to the negative pole and the negatively-charged chlorine ions are attracted to the positive pole. These ions carry the electricity through water. The essence of the above process is that an "invisible wire" is formed that allows electrons to move from ion to ion across the water.
Before the Activity
- Gather materials.
- Cut enough 4-6 inch pieces of insulated copper so each group has four pieces.
- Print out and cut apart the attached Saltwater Cards , enough so you have one card per group (the two-page attachment contains 20 different cards, each providing the salt and water measurements to make three different saltwater concentration solutions).
- Make copies of the Saltwater Circuit Worksheet (without Multimeter) or Saltwater Circuit Worksheet (with Multimeter) , one per group, depending on whether or not multimeters are available to use.
- Divide the class into groups of two or three students each.
With the Students — Building the Saltwater Circuit
1. Individually wrap two large Popsicle sticks in aluminum foil (see Figure 2-left). These are your electrodes.
2. Connect one wire to each electrode using electrical tape. Make sure the bare end of the wire touches the aluminum foil (see Figure 2-left).
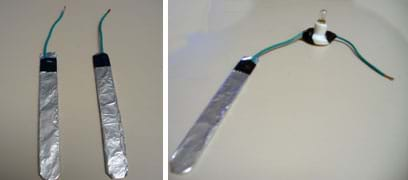
3. Connect the opposite end of the wire from one electrode to one terminal of the light bulb socket. Insert the bare wire around the socket terminal and tighten with a screwdriver. Add a piece of electrical tape to secure the connection (see Figure 2-right).
4. Connect a wire to the opposite terminal of the light bulb socket. Again tighten with a screwdriver and cover with a piece of electrical tape (see Figure 2-right).

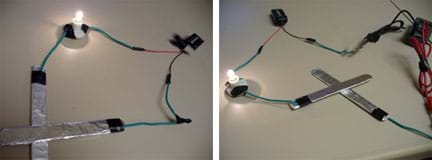
5. Use electrical tape to connect the wire from the light bulb socket to the red wire of the 9-volt battery cap (see Figure 3-left).
6. Use electrical tape to connect a wire to the black wire of the 9-volt battery cap (see Figure 3-left).
7. If using a multimeter: Connect the free wire to the negative terminal of the multimeter. Then connect the positive terminal of the multimeter to the free electrode (see Figure 3-middle).
8. If not using a multimeter: Use electrical tape to connect the free wire of the battery cap to the free electrode (see Figure 3-right).
9. Test your circuit by touching the two electrodes together. This completes the circuit, allowing electricity to flow from one terminal of the battery to the other, and illuminates the light bulb in the process. If the bulb does not light up, check your wire connections to make sure they are all secure and try again. (See Figure 4.)
With the Students — Solutions, Data Collection and Analysis
1. Hand out the Saltwater Circuit Worksheet and the Saltwater Cards to each group.
2. Direct teams to use the information provided on the card to make three different saltwater solutions. Label the cups A, B, C, from highest to lowest salt concentration. Have students calculate the density (mass/volume) for each mixture and record in Table 1 of the worksheet.
3. Data Collection Have students insert both electrodes in one saltwater solution (without touching electrodes) and observe how bright the light bulb becomes and record the current reading from the multimeter. (If multimeters are unavailable, making a visual observation is sufficient.) Record measurements and/or observations on the worksheets.
4. Data Analysis Rank the solutions from dimmest to brightest by visual observation.
5. (If using multimeters) Once the solutions have been ranked, have students plot the electrical current readings vs. density.
6. Have students calculate the percent of the solution's mass that is salt [(Mass of Salt / Total Mass of Salt and Water)*100%].
7. Conclude the activity by having students complete the Reflection Worksheet, as described in the Assessment section.
closed circuit: An electrical circuit that is conducting electricity.
density: Mass per unit volume.
electric current: The rate of flow of electric charge, measured in amperes (A).
electrical circuit: A chain of connected circuit elements.
input: The object going into a system.
ion: An atom that has an electrical charge because it has either gained or lost an electron.
multimeter: An electronic measuring device that combines several measurement functions into one unit.
open circuit: An electrical circuit that is not conducting electricity.
output: The object coming out of a system.
short circuit: When electrical current is diverted from all circuit elements to few or no circuit elements other then the battery.
system: An object that receives inputs and transforms them into output.
voltage: Electrical potential difference, measured in volts (V).
Pre-Activity Assessment
Class Discussion: During the Saltwater Circuit Presentation (PowerPoint), create an environment in which students can be actively involved in the discussion.
Activity Embedded Assessment
Data Analysis Worksheet: During the data collection phase of the activity procedure, have student teams fill out the attached the Saltwater Circuit Worksheet (two versions: without multimeter and with multimeter ).
Post-Activity Assessment
Reflection: Have students answer questions about concepts learned and their participation in the Reflection Worksheet . Review worksheets to gauge students' mastery of the subject matter.
Does more salt in the saltwater circuit mean that light bulb will be brighter than if less salt is used? (Answer: Yes. If you increase the amount of salt in the saltwater solution, the light bulb becomes brighter.)
Do you think you can continue to add salt and make the light bulb brighter, or is there a point at which more salt does not affect the brightness of the light bulb? (Answer: Eventually, any additional salt will not cause the light bulb to become brighter. Only so much electrical current can be drawn from a battery source for a given electrical circuit.)
Safety Issues
- Have students use goggles or safety glasses for eye protection.
- If not using a battery cap, it is easy to short circuit the battery if the wire ends that are connected to the positive and negative terminals of the battery touch. If they touch, the battery overheats and can cause severe burns.
If the light bulb does not light up, make sure all wire connections are tight.
Continue the activity by conducting the associated Water Desalination Plant activity in which students design/build/test a model desalination plant using inexpensive materials.
- For lower grades, only use visual observations (eliminate the multimeter).
- For upper grades, allow students to select several salt-to-water ratios to test electrical conductivity.

Students learn about the techniques engineers have developed for changing ocean water into drinking water, including thermal and membrane desalination. They learn how processes can be viewed as systems, with unique objects, inputs, components and outputs, and sketch their own system diagrams to desc...

Student groups construct simple conductivity probes and then integrate them into two different circuits to test the probe behavior in solutions of varying conductivity (salt water, sugar water, distilled water, tap water).

Students use a thermal process approach to design, build and test a small-scale desalination plant that is capable of significantly removing the salt content from a saltwater solution. Students use a saltwater circuit to test the efficiency of their model desalination plant and learn how the water c...

PBS Kids Go. Zoom-Saltwater Rocks. WGBH Educational Foundation. Accessed May 1, 2010. http://pbskids.org/zoom/activities/sci/saltwatertester.html
Wikipedia.org, Wikipedia Foundation Inc., Accessed May 1, 2010. (Source of vocabulary definitions, with some adaptation.) http://wikipedia.org
Other Related Information
Browse the NGSS Engineering-aligned Physics Curriculum hub for additional Physics and Physical Science curriculum featuring Engineering.
Contributors
Supporting program, acknowledgements.
The contents of this digital library curriculum were developed under a grant from the Fund for the Improvement of Postsecondary Education (FIPSE), U.S. Department of Education and National Science Foundation GK-12 grant no. 0338326. However, these contents do not necessarily represent the policies of the Department of Education or National Science Foundation, and you should not assume endorsement by the federal government.
Last modified: June 5, 2020

Electricity Adventure: Illuminating Science with a Saltwater Circuit
Building a saltwater circuit with your child is a fantastic way to introduce them to the wonders of science and electricity!
This experiment walks through building a simple circuit using saltwater (which happens to be conductive!). It combines the science of saltwater and the technology of a circuit in one fun experiment.
Who knows, this simple saltwater circuit might be the spark that ignites a lifelong passion for science and engineering in your little one. Happy experimenting!

How to make the Electricity Adventure Saltwater Circuit technology experiment
Supplies you will need.
For this experiment, you will need the following:
- Small container or cup
- Table salt (sodium chloride)

- Optional: scissors

Before you start
Please watch your child around electronics and scissors in this experiment.
Instructions
Here is how to do this experiment:
Step 1: Assembling the saltwater solution

First up, we’re going to make our saltwater solution for the experiment. Sprinkle some salt into the container with water and mix it until dissolved.
We just created an ionic bond!
Here’s a little science behind why salt water is conductive (and why salt by itself isn’t): when the salt (sodium chloride) dissolves in the water, the chlorine and sodium atoms separate because of the water molecules.
Those chlorine and sodium atoms move around the liquid as both positively and negatively charged ions, and that separation of charge allows our salt water to conduct electricity!
Here’s a good article diving further into how salt water is conductive .
Step 2: Connecting the battery
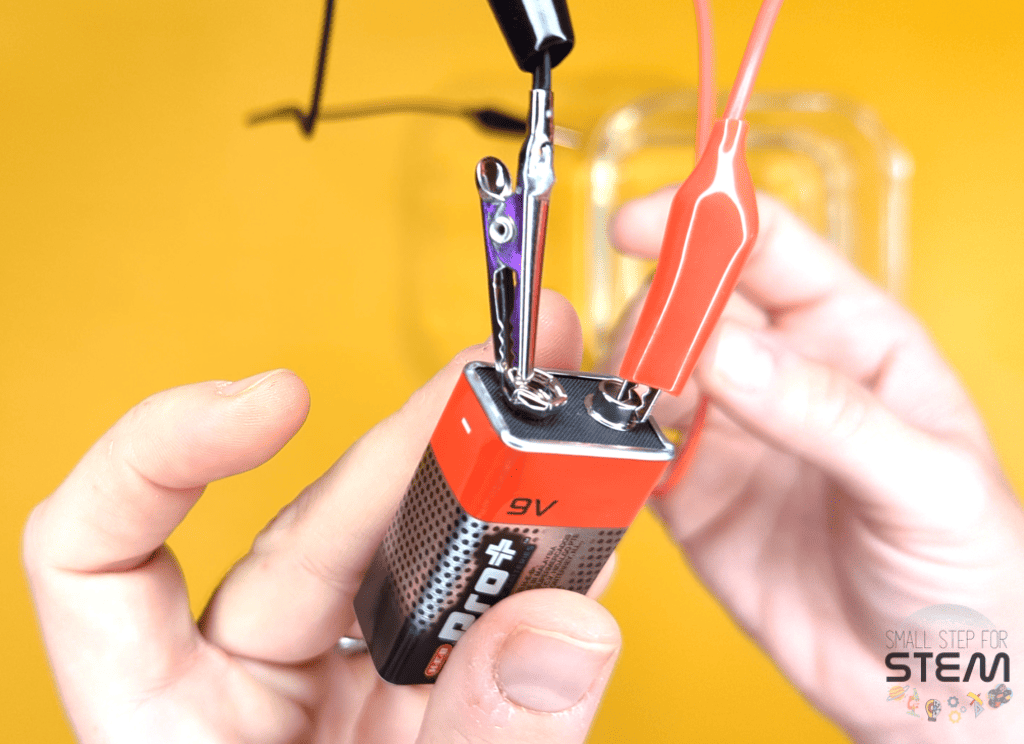
First, we are going to use two alligator clips to connect to the positive and negative terminals of the battery.
I decided to use black for the negative and red for the positive since those are the typical color associations. It also helps me keep track of my positive and negative flows of current!
Step 3: Connecting the LED to the alligator clips

Next up, we are going to use our existing positive current alligator clip (my red alligator clip from the last step) and a new alligator clip for the negative current .
The positive current will run to the positive leg of the LED (the anode, or the longer of the two legs) and the negative current will run to the negative leg of the LED (the cathode, or the shorter of the two legs).
Here’s a picture showing the anode and cathode that I’m using from our conductive dough circuit experiment :

So, for our experiment, we want to use the alligator clip that is connected to the positive terminal on our 9-volt battery to the anode of our LED. Then, use a new alligator clip (I chose black because it’s negative current) to connect to the cathode.
Step 4: Connect electrical wires
Next up, we’re going to connect an electrical wire to the alligator clip that is coming from the negative terminal of the battery. Take a look at your electrical wires and ensure that the ends are exposed. You can see it in the photo below that about half an inch of the electrical wire has been exposed using scissors.

Then, connect another electrical wire to the alligator clip coming from the cathode (shorter leg) of the LED.
We’re about to close our circuit!
In case any of that is hard to visualize, here’s an annotated photo:

Step 5: Close the circuit!

We’re closing our circuit in this step!
Again here, we want to make sure both ends of each electrical wire are exposed. When we dip the electrical wire in the saltwater solution, we want to make sure the end is exposed so we can complete the circuit.
To close the circuit, dip the exposed ends of the electrical wires into the saltwater solution.
Your LED will light up!

Step 6: Experimenting with the circuit
Now comes the fun part—experimenting with the saltwater circuit! Here are some additional activities to explore:
- Changing the brightness: Gradually add more salt to the water and observe how it affects the brightness of the LED. More salt increases the conductivity, causing the LED to shine brighter.
- Exploring different materials: Substitute the saltwater with other solutions like sugarwater or vinegar and see how they impact the circuit. Note that not all liquids conduct electricity, so it’s an excellent opportunity to discuss the concept of conductors and insulators.
- Creating a circuit with multiple LEDs: Using more copper wire, LEDs, and a battery with a higher voltage, experiment with building more complex circuits, such as series and parallel connections, to light multiple LEDs simultaneously.
The technology behind the Electricity Adventure Saltwater Circuit technology experiment
This experiment teaches:
Introduction to electricity
Conductors and insulators, curiosity and exploration, how it works.
The saltwater circuit experiment works by creating a circuit with a battery, LED, and salt water, and connecting them with electrical wires and alligator clips.
When a 9-volt battery is connected to the circuit, we are introducing an electric current to the circuit. As current flows to the salt water, the presence of the sodium and chlorine atoms allows the electricity to continue to flow through the water.
As a result, the LED lights up!
The saltwater circuit experiment introduces kids to the concept of electricity in a simple and tangible way.
It’s an excellent way to show how a circuit works to light up the LED. If any of the components are removed from the circuit, it may not work as well as intended.
Through this experiment, kids can grasp the distinction between conductors and insulators.
They discover that salt water, as a conductor, allows electricity to flow, while other materials might not (like sugar water).
This lesson helps them understand why certain substances are used to conduct electricity in everyday devices.
Engaging in hands-on activities like building a saltwater circuit sparks curiosity and encourages kids to explore and ask questions.
They are able to play with the circuit to learn what each piece does, change out materials to see how it affects the circuit, and if they’re really interested in circuits and electricity, could even open the door to talk about electricity in everyday household objects!
More technology experiments to try out with your child
- Conductive Dough Circuits: Use some Play-Doh to build a fun and creative circuit!
Related experiments
Emotron 3000: Build an emotion meter circuit!
If your child is like many other kids out there, they have trouble pinpointing their emotions and what they're feeling. Today's experiment not only helps with that but puts a fun and educational spin...
Light Up the Cosmos: Craft a solar system circuit!
Ready for a cosmic adventure that combines science and technology? This experiment puts science and technology into practice by working on the arrangement of the planets, talking about the solar...
Salt Water Conductivity Experiment
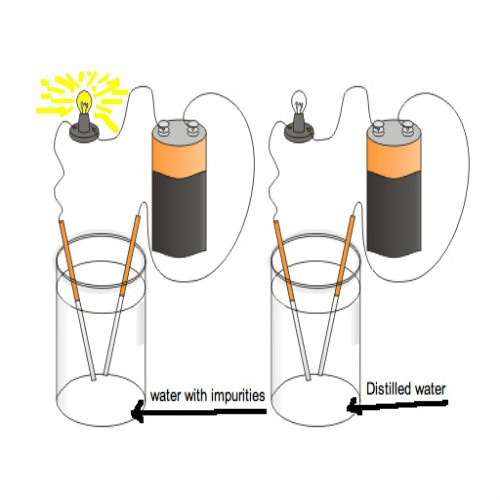
Completing Connection Now using the third wire with crocodile extremity, connect the positive terminal of the battery with the other copper plate. This completes the wire connection for the experiment.
Inserting Copper Electrodes After that, fill the glass with distilled water and then immerse the two copper electrodes in it without letting them come in contact with each other. It will be observed that there will be negligible deflection shown in the voltmeter.
Removing Copper Electrodes Remove the copper electrodes from the glass and add some salt in to the water. Stir thoroughly with the help of tea spoon to let the salt dissolved properly.
Placing Copper Electrodes in Salted Water Now again immerse the copper electrodes in the salt solution. It will be noticed that some deflection is shown in the voltmeter showing that addition of salt ionizes pure water and allows conduction of electric current.
- Print Article

People Who Read This Also Read:


Saltwater Battery + Lesson Plan

Introduction: Saltwater Battery + Lesson Plan

Electricity can be very complex, but it doesn't have to be! In fact, it's so simple we can generate electricity with a small cup of saltwater. This project is a great introductory project to electricity and is ideal for middle schoolers all the way to high school seniors. If you're using this in a classroom setting, please view the attached documents for a lesson plan, lab guide, and post lab assignment. The lesson plan is meant for students aged 14-18.
Attachments
For each group, you'll need:
An Eight oz. Plastic Cup
180 mL of Water
30 grams of salt
2 pieces of ten cm. Conductive Wire (Copper works best)
A Multimeter
A stirring rod or spoon
2 Alligator Clips
Optional: Scotch Tape
Step 1: Add Saltwater to the Cup

Begin by making sure your plastic cup is empty and clean. Pour in the water, and add the salt. Using a stirring rod or spoon, gently mix the solution until the salt is fully dissolved.
Step 2: Thread the Wires Through the Alligator Clips

Thread the wire through the holes in the end of the alligator clip. Wrap the wire around the base to ensure that the wire stays in contact with the clip. Do this with both clips.
Step 3: Insert Your Wires

Once the salt has dissolved, insert the wire into your cup of saltwater. The wires shouldn't touch each other and should only come in contact with the water and the cup. If you're struggling making the wires stay apart from one another, tape the wires to the inside of the cup.
Step 4: Attach the Multimeter

Make sure the multimeter is turned on. The multimeter should be set to DCV 20. Attach the red cable to one clip, and the black cable to the other clip.
Step 5: Watch Your Current

Tada! You successfully created a battery and an electrical current! The multimeter should show that there's an electric current flowing through it. Although there isn't much to watch, you will see the display on the multimeter change. If enough of the batteries are joined together they could potentially power a small light.
You can take the experiment further by changing the salt to water ratios and recording which one produces the most voltage, experimenting with different wire materials, or using a fluid other than water.
Please take the time to view the attached documents if you wish to integrate this into a lesson plan.
- Is Matter Around Us Pure?
We all use different forms of batteries in our everyday life. A battery is defined as a device that can convert the chemical energy of its cell parts into electrical energy. There are different types of batteries which come in different forms and sizes along with the power and energy they can produce. But what if we ever run out of batteries? This science experiment will teach how to produce electricity with ‘Salt’- one of the common household componenst and water.
This experiment mainly aims at exploring components of the battery and focuses primarily on the areas of conductivity in a battery and its effects on the generation of electricity . You may have already seen the usage of batteries in various areas. Here you can explore it in detail.
Materials Required
- Copper-Coated wire
- Zinc Coated Nail
- Graph, Paper
- Two insulated wires with alligator clips on both the ends
- Small Glass Jar
- Measuring Spoons
Step 1: First, prepare a saltwater solution. Take a small amount of water in a jar and mix it well along with two or three pinches of salt.
Step 2: Now place a zinc-coated nail in the solution.
Step 3: Tape the nail to one end of the jar. It should be to the -ve electrode.
Step 4: Attach an alligator clip of one wire to one edge of the coated zinc wire that is falling free outside the solution.
Step 5: The alligator clip can be removed by squeezing.
Step 6: Now, attach the alligator clip of one end of the wire to the -ve terminal of the voltmeter.
Step 7: Connect the copper-coated nail to the +ve terminal of the voltmeter. To do this, repeat the same procedure that has been specified above for zinc-coated nails.
Step 8: Observe the dial of a voltmeter and pen down the readings that determine the amount of current flow between the two electrodes.
Step 9: Once again add a pinch of salt and check the readings. Repeat the same procedure to pen down more readings.
Check out the difference in the readings. It can be plotted in a graph for reference. In a graph, there exists a point where the current stops increasing.
Recommended Videos
Acids and bases.

Interesting experiment, isn’t it? Learn more about such experiments with video lectures and explore the wonders of science with BYJU’S – The Learning App

Put your understanding of this concept to test by answering a few MCQs. Click ‘Start Quiz’ to begin!
Select the correct answer and click on the “Finish” button Check your score and answers at the end of the quiz
Visit BYJU’S for all Chemistry related queries and study materials
Your result is as below
Request OTP on Voice Call
Leave a Comment Cancel reply
Your Mobile number and Email id will not be published. Required fields are marked *
Post My Comment
Register with BYJU'S & Download Free PDFs
Register with byju's & watch live videos.

Amazing Saltwater and Electricity conductivity science experiment using a 9v battery with explanation
Creating a saltwater and electricity conductivity experiment using a 9V battery can be a simple and informative project.
Here’s a step-by-step guide:
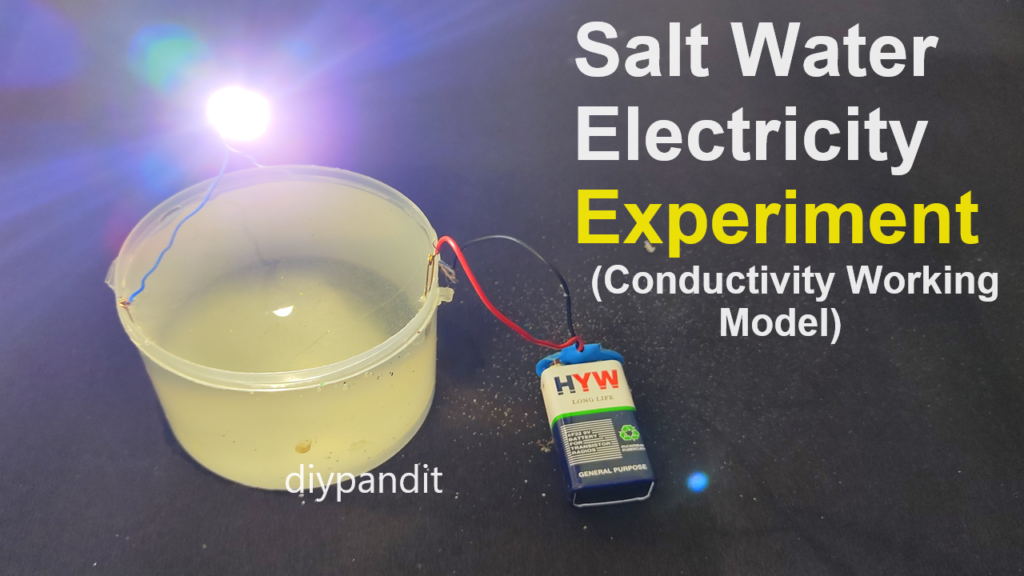
Materials Needed:
- Two metal electrodes (such as copper wires or nails)
- Battery clip or holder
- Wires with alligator clips
- LED (optional, for indicating conductivity)
- Safety goggles (recommended)
Steps by Step Video Instructions:
- Cut two pieces of wire, each about 6 inches long.
- Strip the insulation from the ends of the wires to expose the metal.
- Fill a cup or small container with water.
- Add salt to the water and stir until it dissolves. You want to create a saturated saltwater solution.
- Attach the battery clip or holder to the 9V battery.
- Connect one end of one wire to the positive terminal (+) of the battery.
- Connect the other end of the same wire to one of the metal electrodes.
- Connect one end of the second wire to the negative terminal (-) of the battery.
- Connect the other end of the second wire to the other metal electrode.
- Submerge the metal electrodes into the saltwater solution.
- Make sure the electrodes do not touch each other in the water.
- Wear safety goggles for protection.
- When the electrodes are submerged, the circuit is complete.
- Bubbles forming on the electrodes, indicating electrolysis of water.
- An LED connected in series with the circuit lights up, indicating the flow of electricity.
- If the LED doesn’t light up, try reversing the connections to the battery.
- Try adding more salt to the solution and observe any changes in conductivity.
- You can also try using other substances like sugar or baking soda instead of salt to compare their conductivity.
https://www.youtube.com/@diypandit
Leave a Comment Cancel reply
Save my name, email, and website in this browser for the next time I comment.

LEARN HOW TO DO EVERYTHING
Difference between a blackhead and a pimple.
How to Remove a Griffin iPad Case

How to Celebrate National Arbor Day

How to Prevent Poison Ivy from Spreading
How to Even Out Skin Complexion

How to Hide Pictures on Android

How to Get Rid of a Screen Saver

Classy Weekend Bags for Women

Salt Water Conductivity Experiment
Home » Education » Salt Water Conductivity Experiment
If you are interested in trying a fun and simple science project with your children, why not try an electricity conductivity experiment with salt water? This experiment proves that pure water is not a good conductor but with salt, it is ionized and turns into a conductor.
Here is how the experiment it done:
Things you will need
- Water glass
- Battery (4-5 Volts)
- 2 copper electrodes
Instructions
- With the wire, connect the red terminal of the battery with a copper electrode. Now connect the black terminal the same way.
- With the third wire left, connect the positive terminal of the batter to the copper plate.
- Fill the glass with water and place the copper electrodes in it without them touching each other. Nothing happens to the voltmeter.
- Remove the electrodes and add salt to the water. Stir, and immerse the electrodes.
- The voltmeter will show a deflection!
- You can also use a bulb instead of a battery.

Share this:
- Click to share on Twitter (Opens in new window)
- Click to share on Facebook (Opens in new window)
- Click to share on Google+ (Opens in new window)
- Click to share on Pinterest (Opens in new window)
- Click to share on WhatsApp (Opens in new window)
- Click to share on Reddit (Opens in new window)
Next post How to Remove a Rack and Pinion
Previous post how to frame a canvas painting yourself, leave a reply cancel reply.
Your email address will not be published. Required fields are marked *
Notify me of follow-up comments by email.
Notify me of new posts by email.

IMAGES
COMMENTS
Jun 5, 2020 · Students build a saltwater circuit, which is an electrical circuit that uses saltwater as part of the circuit. Students investigate the conductivity of saltwater, and develop an understanding of how the amount of salt in a solution impacts how much electrical current flows through the circuit. They learn about one real-world application of a saltwater circuit — as a desalination plant tool ...
Learn how to use salt water to make a light bulb light up with this fun science project. Find out why salt water is a good conductor of electricity and how to build a simple circuit with a battery, wires, and electrodes.
Jul 27, 2023 · The saltwater circuit experiment works by creating a circuit with a battery, LED, and salt water, and connecting them with electrical wires and alligator clips. When a 9-volt battery is connected to the circuit, we are introducing an electric current to the circuit.
Aug 30, 2023 · Electrical conductivity in water refers to its ability to conduct an electric current. The presence of dissolved ions, such as salts, minerals, and other charged particles, allows water to conduct electricity. When salt is added to water, it increases the concentration of ions, leading to higher electrical conductivity. Here's how electrical conductivity in water with
In this experiment you just have to prove that pure water is not a good electricity conductor but addition of salt (Sodium Chloride) makes it ionized and hence conduct electric current. Things Required: – Drinking Water Glass – Battery 4 to 5 Volts – Voltmeter – 3 Wires with Crocodiles – 2 Copper Electrodes – Distilled Water
You can take the experiment further by changing the salt to water ratios and recording which one produces the most voltage, experimenting with different wire materials, or using a fluid other than water. Please take the time to view the attached documents if you wish to integrate this into a lesson plan. Thank you!
This science experiment will teach how to produce electricity with ‘Salt’- one of the common household componenst and water. Objective: This experiment mainly aims at exploring components of the battery and focuses primarily on the areas of conductivity in a battery and its effects on the generation of electricity. You may have already seen ...
5.In a pitcher, prepare some strong, warm salt water. Add enough salt so at the end some salt will be left at the bottom of the pitcher. 6. Transfer the salt water from the pitcher to the experiment container. Make sure the depth of saltwater is about 4 to 5 inches. 7.
May 9, 2024 · Saltwater and Electricity conductivity experiment using a 9v battery. Prepare Your Components: Cut two pieces of wire, each about 6 inches long. Strip the insulation from the ends of the wires to expose the metal. Prepare the Saltwater Solution: Fill a cup or small container with water. Add salt to the water and stir until it dissolves.
Dec 18, 2016 · This experiment proves that pure water is not a good conductor but with salt, it is ionized and turns into a conductor. Here is how the experiment it done: Things you will need Water glass; Water; Battery (4-5 Volts) 3 wires; 2 copper electrodes; Salt; Spoon . Instructions With the wire, connect the red terminal of the battery with a copper ...